
Back to basic, to create something wearable. A crocheted item for people who do not like crocheted items. A handmade hat that doesn’t look handmade. Perfect fit. That was the goal. A hat that keeps you warm and is usable every day.
It all started with a simple need. I needed a new hat. Fall has come to Sweden and it is getting cold. And as i always loved simplicity of the the look of “scs in back loop only” rows, it was very easy to decide how my new hat should look like. Like a classic fisherman hat, working class…. common. Nothing special. A hat that common people wear.
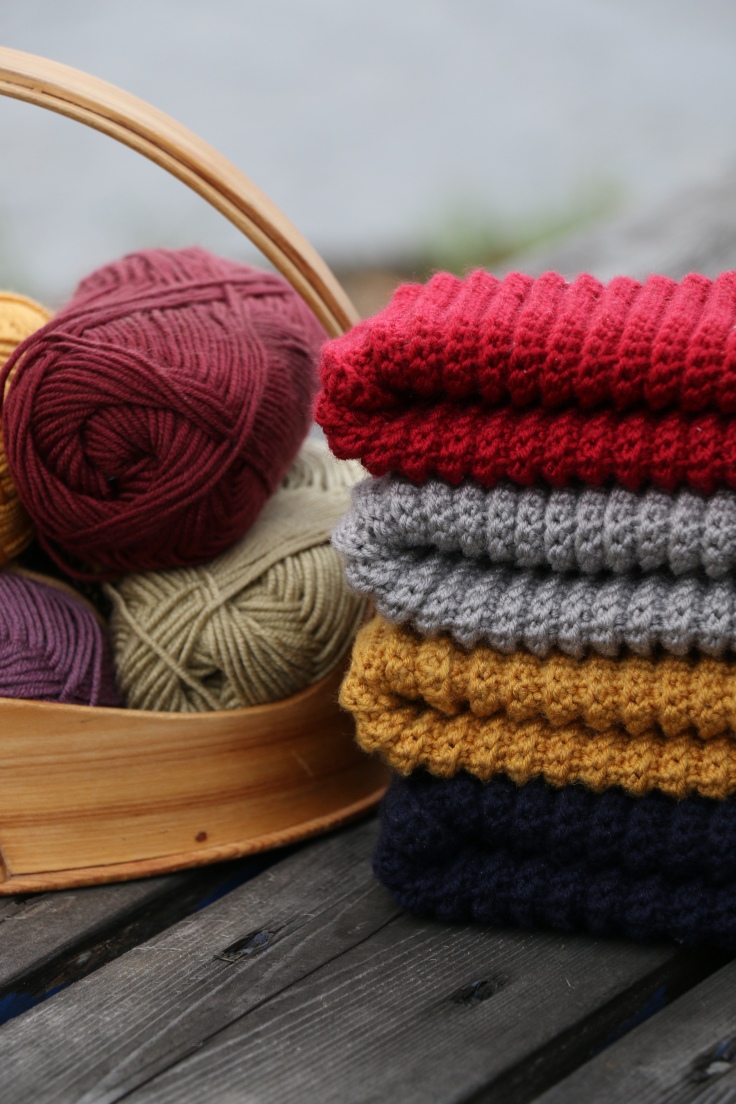
Scheepjes Merino Soft was the natural choice because it is the softest yarn I know. And I think that it is a very “kind” yarn. It is easy to crochet even and neat. It comes in 49 colors and it will be very easy for you to find the color that satisfies your needs. You will need 3 balls of 50 gram. If you crochet very loose you might need 4 balls.
My favorite simple hat, which I bought a few years ago was some kind of a blueprint for my new hat and when I finished it it, I really was surprised how people outside the crochet bubble reacted. Literally everyone wanted to have a similar hat. My friends, my family, my colleges. So i just kept on producing hats in different colors. And I decided to simply write down how it is done.
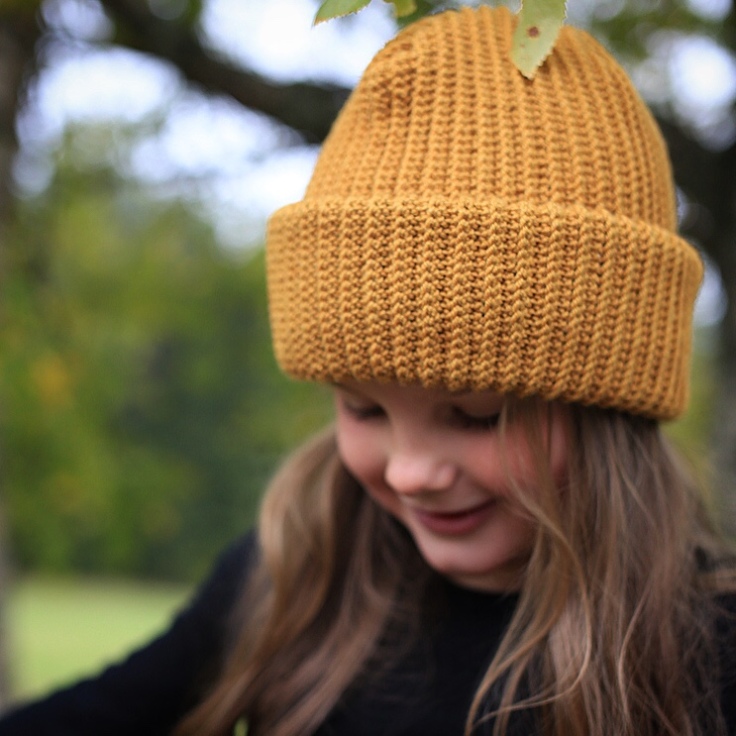
I am well aware of that this is not a pattern for advanced crocheters. It is not the kind of pattern that creates a lot of attention. It is not the hat that shows how skilled your craft is. It is the hat you and your loved ones can use on a cold winter daily basis. And it is very easy to crochet. Perfect for beginners and people who do not crochet all of the time! The pattern is manageable for everyone who has had a crochet hook in his/her hands before,
A big, big “thank you” to all the people who supported me and helped me on my way. A special thanks to everyone who tested my patterns and translated them. Thank you @sunshineyalex for every test you did, @nettis01 for doing the Swedish translation (which also will be published in the magasin “LAND“) and @ninamayerhaekelt for the German translation.
If you want to support my work you can buy the pattern as a printable PDF on Ravelry. It comes in U.K., U.S./European, Swedish and German terms/language. You will find it HERE HERE HERE!
If you use my patterns and post pictures in social medias it would be nice to link or refer to my blog www.martinupnorthblog.wordpress.comand use #martinupnorth . Feedback is more than welcome!
Materials
Hook 4.50 mm
Scheepjes Merino Soft 50% Wool Superwash Merino x 25% Microfiber x 25% Acrylic
3 balls 50g any colour
Material
Virknål 4.50 mm
Scheepjes Merino Soft 50% Wool Superwash Merino x 25% Microfiber x 25% Acrylic
3 nystan 50g valfri färg
Measurements
Height: 36cm
One size fits (nearly) all. Very stretchy.
Mått
Höjd: 36cm
En storlek passar (nästan) alla. Väldigt töjbar.
Gauge
In pattern 24 rows x 22 stitches = 10x10cm
Masktäthet
i mönstret: 24 varv x 22 maskor = 10x10cm
Abbreviations (U.S. / European crochet terms)
ch(s) chain or chain stitches
sc single crochet
sc2tog single crochet 2 together: (insert hook in st/sp, yoh, pull up loop) twice, yoh, draw through all loops
blo back loop only: insert hook under back loop onl
Förkortningar
lm luftmaska
fm fastmaska
fm2tills fastmaskor 2 tillsammans: (stick virknålen i maska/lm, omtag, dra igenom) två gånger, omtag, dra igenom alla öglorna
bmb bakre maskbågen: virka endast i bakre maskbågen
Pattern Notes
- Ch1 at beg of row does not count as st. First sc is always worked in same stitch as ch1.
- The last stitch in every row can be hard to spot. Make sure that you have the right stitch count in every row.
- The hat is adjustable in length. A chain of 70 makes a height of 36cm which is perfect to have a double brim. The length can be adjusted by simply making more or less starting chains.
- When joining crochet through the stitches and NOT through the turning chain to make the joining more solid.
Information om mönstret
- 1 lm i början på varvet räknas inte som en maska. Första fm görs alltid i samma maska som 1lm.
- Sista maskan på varvet kan vara svår att se. Se till att du har rätt antal maskor efter varje varv.
- Mössan är justerbar på längden. Med 70 lm blir mössan 36 cm vilket blir perfekt till en dubbelvikt kant. Längden kan justeras genom att lägga till eller ta bort lm på lmkedjan.
- När du virkar ihop, så virka genom maskorna och INTE genom vänd lm, för att ihopvirkningen ska bli mer solid.
Pattern:
Mönster:
Ch70
70 lm
Row 1 1sc in second ch, 1sc in every ch till second to last chain, 2sc in last chain, ch1, turn. (70 sc)
Varv 1 1fm i andra lm, 1fm i varje lm till näst sista lm, 2fm i sista lm, 1lm, vänd. (70 fm)
Row 2 2sc in blo in first sc, 69sc in blo, ch1 turn. (71 sc)
Varv 2 2fm i bmb i första fm, 69fm i bmb, 1lm, vänd. (71 fm)
Row 3 70sc in blo, 2sc in blo in last sc, ch1, turn. (72 sc)
Varv 3 70fm i bmb, 2fm i bmb i sista fm, 1lm, vänd. (72 fm)
Row 4 2sc in blo in first sc, 71sc in blo, ch1 turn. (73 sc)
Varv 4 2fm i bmb i första fm, 71fm i bmb, 1lm, vänd. (73 fm)
Row 5 72sc in blo, 2sc in blo in last sc, ch1, turn. (74 sc)
Varv 5 72fm i bmb, 2fm i bmb i sista fm, 1lm, vänd. (74 fm)
Row 6 2sc in blo in first sc, 73sc in blo, ch1 turn. (75 sc)
Varv 6 2fm i bmb i första fm, 73fm i bmb, 1lm, vänd. (75 fm)
Row 7 74sc in blo, 2sc in blo in last sc, ch1, turn. (76 sc)
Varv 7 74fm i bmb, 2fm i bmb i sista fm, 1lm, vänd. (76 fm)
Row 8 2sc in blo in first sc, 75sc in blo, ch1 turn. (77 sc)
Varv 8 2fm i bmb i första fm, 75fm i bmb, 1lm, vänd. (77 fm)
Row 9 76sc in blo, 2sc in blo in last sc, ch1, turn. (78 sc)
Varv 9 76fm i bmb, 2fm i bmb i sista fm, 1lm, vänd. (78 fm)
Row 10 2sc in blo in first sc, 77sc in blo, ch1 turn. (79 sc)
Varv 10 2fm i bmb i första fm, 77fm i bmb, 1lm, vänd. (79 fm)
Row 11 78sc in blo, 2sc in blo in last sc, ch1, turn. (80 sc)
Varv 11 78fm i bmb, 2fm i bmb i sista fm, 1lm, vänd. (80 fm)
Row 12 2sc in blo in first sc, 79sc in blo, ch1 turn. (81 sc)
Varv 12 2fm i bmb i första fm, 79fm i bmb, 1lm, vänd. (81 fm)

Row 13 to row 18 1sc in blo in every sc, ch1, turn. (81 sc)
Varv 13 till varv 18 1fm i bmb i varje fm, 1lm, vänd. (81 fm)
Row 19 79sc in blo, 1sc2tog in blo, ch1, turn. (80 sc)
Varv 19 79fm i bmb, 1fm2tills i bmb, 1lm, vänd. (80 fm)
Row 20 1sc2tog in blo, 78sc in blo, ch1, turn. (79 sc)
Varv 20 1fm2tills i bmb, 78fm, 1lm, vänd. (79 fm)
Row 21 77sc in blo, 1sc2tog in blo, ch1, turn. (78 sc)
Varv 21 77fm i bmb, 1fm2tills i bmb, 1lm, vänd. (78 fm)
Row 22 1sc2tog in blo, 76sc in blo, ch1, turn. (77 sc)
Varv 22 1fm2tills i bmb, 76fm i bmb, 1lm, vänd. (77 fm)
Row 23 75sc in blo, 1sc2tog in blo, ch1, turn. (76 sc)
Varv 23 75fm i bmb, 1fm2tills i bmb, 1lm, vänd. (76 fm)
Row 24 1sc2tog in blo, 74sc in blo, ch1, turn. (75 sc)
Varv 24 1fm2tills i bmb, 74fm i bmb, 1lm, vänd. (75 fm)
Row 25 73sc in blo, 1sc2tog in blo, ch1, turn. (74 sc)
Varv 25 73fm i bmb, 1fm2tills i bmb, 1lm, vänd. (74 fm)
Row 26 1sc2tog in blo, 72sc in blo, ch1, turn. (73 sc)
Varv 26 1fm2tills i bmb, 72fm i bmb, 1lm, vänd. (73 fm)
Row 27 72sc in blo, 2sc in blo in last sc, ch1, turn. (74 sc)
Varv 27 72fm i bmb, 2fm i bmb i sista fm, 1lm, vänd. (74 fm)
Row 28 2sc in blo in first sc, 73sc in blo, ch1 turn. (75 sc)
Varv 28 2fm i bmb i första fm, 73fm i bmb, 1lm, vänd. (75 fm)

Row 29 74sc in blo, 2sc in blo in last sc, ch1, turn. (76 sc)
Varv 29 74fm i bmb, 2fm i bmb i sista fm, 1lm, vänd. (76 fm)
Row 30 2sc in blo in first sc, 75sc in blo, ch1 turn. (77 sc)
Varv 30 2fm i bmb i första fm, 75fm i bmb, 1lm, vänd. (77 fm)
Row 31 76sc in blo, 2sc in blo in last sc, ch1, turn. (78 sc)
Varv 31 76fm i bmb, 2fm i bmb i sista fm, 1lm, vänd. (78 fm)
Row 32 2sc in blo in first sc, 77sc in blo, ch1 turn. (79 sc)
Varv 32 2fm i bmb i första fm, 77fm i bmb, 1lm, vänd. (79 fm)
Row 33 78sc in blo, 2sc in blo in last sc, ch1, turn. (80 sc)
Varv 33 78fm i bmb, 2fm i bmb i sista fm, 1lm, vänd. (80 fm)
Row 34 2sc in blo in first sc, 79sc in blo, ch1 turn. (81 sc)
Varv 34 2fm i bmb i första fm, 79fm i bmb, 1lm, vänd. (81 fm)
Row 35 to row 40 1sc in blo in every sc, ch1, turn. (81 sc)
Varv 35 till varv 40 1fm i bmb i varje fm, 1lm, vänd. (81 fm)
Row 41 79sc in blo, 1sc2tog in blo, ch1, turn. (80 sc)
Varv 41 79fm i bmb, 1fm2tills i bmb, 1lm, vänd. (80 fm)
Row 42 1sc2tog in blo, 78sc in blo, ch1, turn. (79 sc)
Varv 42 1fm2tills i bmb, 78fm i bmb, 1lm, vänd. (79 fm)

Row 43 77sc in blo, 1sc2tog in blo, ch1, turn. (78 sc)
Varv 43 77fm i bmb, 1fm2tills i bmb, 1lm, vänd. (78 fm)
Row 44 1sc2tog in blo, 76sc in blo, ch1, turn. (77 sc)
Varv 44 1fm2tills i bmb, 76fm i bmb, 1lm, vänd. (77 fm)
Row 45 75sc in blo, 1sc2tog in blo, ch1, turn. (76 sc)
Varv 45 75fm i bmb, 1fm2tills i bmb, 1lm, vänd. (76 fm)
Row 46 1sc2tog in blo, 74sc in blo, ch1, turn. (75 sc)
Varv 46 1fm2tills i bmb, 74fm i bmb, 1lm, vänd. (75 fm)
Row 47 73sc in blo, 1sc2tog in blo, ch1, turn. (74 sc)
Varv 47 73fm i bmb, 1fm2tills i bmb, 1lm, vänd. (74 fm)
Row 48 1sc2tog in blo, 72sc in blo, ch1, turn. (73 sc)
Varv 48 1fm2tills i bmb, 72fm i bmb, 1lm, vänd. (73 fm)
Row 49 71sc in blo, 1sc2tog in blo, ch1, turn. (72 sc)
Varv 49 71fm i bmb, 1fm2tills i bmb, 1lm, vänd. (72 fm)
Row 50 1sc2tog in blo, 70sc in blo, ch1, turn. (71 sc)
Varv 50 1fm2tills i bmb, 70fm i bmb, 1lm, vänd. (71 fm)
Row 51 69sc in blo, 1sc2tog in blo, ch1, turn. (70 sc)
Varv 51 69fm i bmb, 1fm2tills i bmb, 1lm, vänd. (70 fm)
Row 52 1sc2tog in blo, 68sc in blo, ch1, turn. (69 sc)
Varv 52 1fm2tills i bmb, 68fm i bmb, 1lm, vänd. (69 fm)
Row 53 68sc in blo, 2sc in blo in last stitch, ch1, turn. (70sc)
Varv 53 68fm i bmb, 2fm i bmb i sista maskan, 1lm, vänd. (70 fm)
Row 54 to row 104 repeat row 2 to row 52.
Varv 54 till varv 104 repetera varv 2 till varv 52.

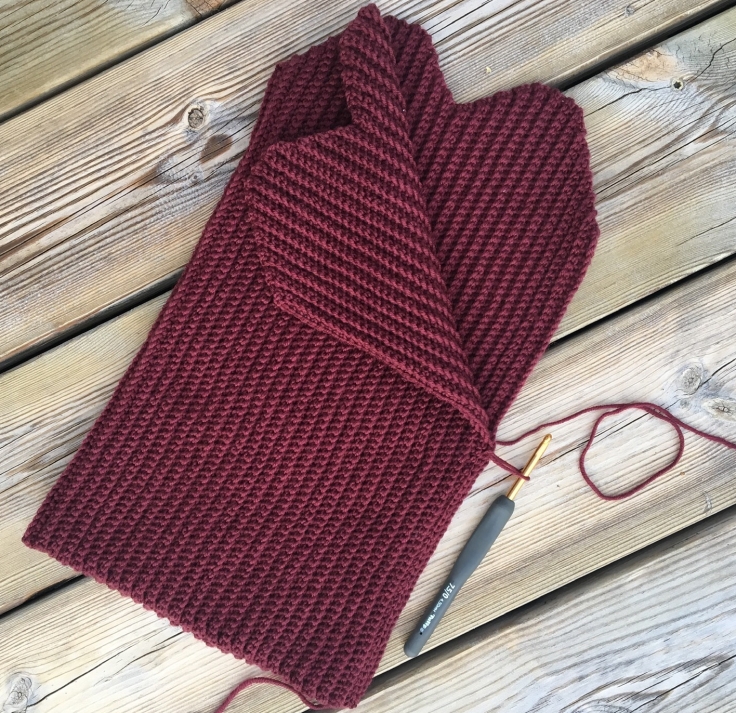
Fold in half so that you can crochet through both row 104 and the backside of the starting row.
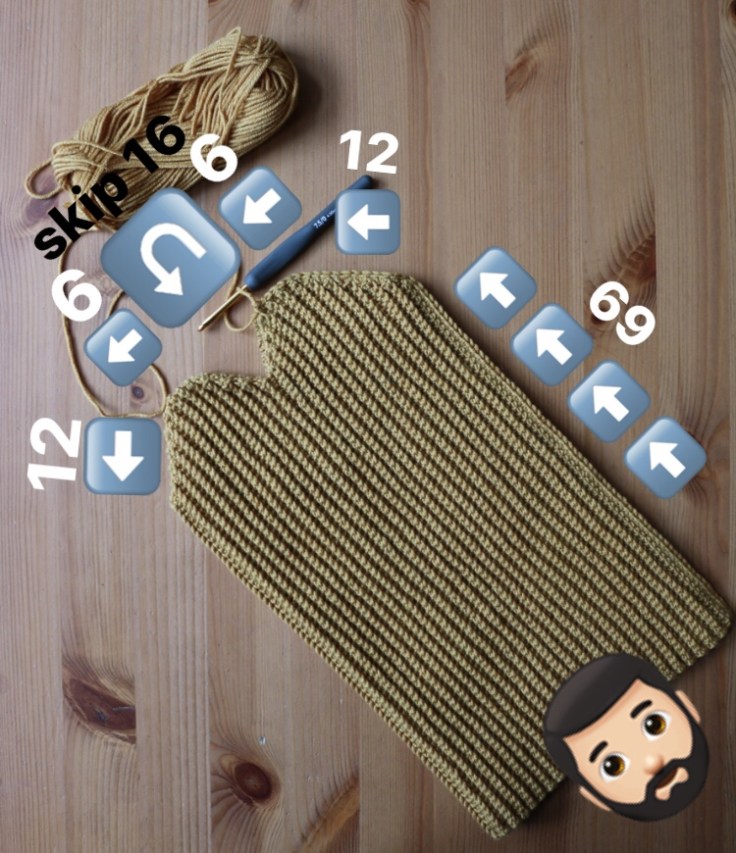
Joining row: 69sc through row 104 and the backside of the starting row. 12sc through the ends of row 104 to 93 and the backside of the ends of row 1 to 12, 6sc through the ends of row 92 to 87 and the backside of row 13 to 18. Skip the ends of row 86 to 71 and the backside of row 19 to 34. 6sc through the ends of row 70 to 65 and the backside of row 35 to 40. 12sc through the ends of row 64 to 53 and the backside of row 41 to 52. Fasten off.

Join yarn through end of row 86 and the backside of row 19. 16sc through end of row 86 to 71 and the backside of row 19 to 34. Fasten off.
Turn hat inside out. Fold a double brim. Try it on. Fits perfectly, doesn´t it?

Vik ihop på hälften så att du kan virka genom både varv 104 och baksidan på första varvet.
Ihopvirkning: 69fm genom varv 104 och baksidan på första varvet. 12fm genom slutet av varv 104 till 93 och baksidan av slutet på varv 1 till 12, 6fm genom slutet av varv 92 till 87 och baksidan av varv 13 till 18. Hoppa över slutet av varv 86 till 71 och baksidan av varv 19 till 34. 6fm genom slutet av varv 70 till 65 och baksidan av varv 35 till 40. 12fm genom slutet av varv 64 till 53 och baksidan av varv 41 till 52. Klipp av garnet.
Fäst garn genom slutet på varv 86 och baksidan på varv 19. 16fm genom slutet av varv 86 till 71 och baksidan av varv 19 till 34. Klipp av garnet.
Vänd mössan rätt. Vik upp en dubbel kant. Prova den. Passar perfekt, eller hur?
More to come soon from up north…

Thank you for this pattern, can’t wait to give it a try.
LikeLiked by 1 person
Hi Martin,
Two weeks ago my husband asked me, “Can you please make me a hat for winter?’ My reply was, “I don’t make hats very well :(“. He said just a nice plain hat that would keep him warm would be great. Two days later I saw your post on IG and was so excited. This is EXACTLY the hat he wants and I’ll start work this weekend on it. Thank you! I purchased it on your Ravelry page as a small token of appreciation for the work you put into this :0) Have a great day!
Robin Jones, USA
LikeLiked by 1 person
Thank you! Really hope that you and your husband like the hat! Greetings from Sweden
LikeLike
Hi Martin,
Thank you so much for sharing this beautiful pattern. And as Robin above, my husband asked exactly the same and his birthday is next monday, so…. I’m busy crocheting. Perfect present! Appreciated.
Greetings, Rachel
from the Netherlands
LikeLiked by 1 person
Have fun! Hope you and your husband like it. Happy Birthday to him!
LikeLiked by 1 person
What weight yarn is a good replacement for the one mentioned in the pattern?
LikeLike
I love this pattern, but am totally confused by the joining and how it works, does it make more sense once you have made it? I will buy the Ravelry pattern, does it have more pictures?? Thank you
LikeLiked by 1 person
The pattern does not have more pictures. I decided to have the joining pictures here. It does make more Sense when you actually do it. If there is a Problem with it, just contact me. I may add a picture of the hat from abhöbe, when the joining is done. Hope that helps.
LikeLike
From above would really help, the last picture with the “hole” is confusing me lol. although it does not take much to confuse me.. 🙂
LikeLiked by 1 person
😂 the picture with the „hole“ is in Progress. You join the hole in the end.
LikeLike
Hey Martin 🙂
Would you please consider updating the paid PDFs with the pictures? The joining really confused me until I found the pictures on the free blog post. I appreciate the free option very much, but I bought the pdf both to support you and to have an easier time reading the pattern with just one language and it was a bit frustrating to not have the pictures in the pdf.
Thank you for a wonderful pattern!
LikeLike
I have the same confusion – also was going to buy the pattern to see if it had more photos. Knowing it doesn’t, I’ll wait to see if you add more photos – “the hole” in progress also isn’t clear to me.
LikeLike
I added a few joining pics. In the end you simply join the two sides of the hole. Like sewing them together. It is very easy when you have the fabric in your hand.
LikeLike
Thank you! Thank you! Thank you! A basic hat with character. You are the best 😀
LikeLiked by 1 person
Hi,
is the manual also available in German?
LikeLiked by 1 person
Available ad a PDF on ravelry.
LikeLike
Tack för det fina reportaget i tidningen LAND!
Allt gott från en annan del av Jämtland
LikeLiked by 1 person
Thank you fir this beautiful hat. I purchased from Ravelry thinking more pics and there are none but it’s so nice to have printed off one language and can mark which row I’m on. Just started tonight so will be a day or so to finish. Hope mine turns out as nice as yours. Thanks again.
LikeLiked by 1 person
TOP!
Kind regards,
Anni
LikeLike
Hello Martin! We live in the Pacific Northwest-US which is indeed hat & cap country,as our winter is rather long. I’m so happy to receive your wonderful pattern, which I will be able to produce en masse and reclined, while recovering. Am also eager to purchase my first merino mix – so many beautiful colors!
LikeLike
Tack, Martin för det utmärkta mönstret. Jag har inte lyckats få till några mössor tidigare (har mest försökt med stickade). Den här tror jag blir perfekt. Köpte ditt mönster på Ravelry, ett lite bidrag som tack för att du delar med dig. Du skrev någonstans att xet kan vara svårt att hitta sista maskan på varvet ibland, jag använder två öppningsbara stickmarkörer com jag sätter i fösta maskan så fort jag virkat den. Det gjorde det lättare att få till rätt maskantal😃
Vänliga hälsningar från Roslagen /Agneta
LikeLiked by 1 person
Thank you for sharing this pattern. I appreciate your sharing!
LikeLiked by 1 person
Hi there,
Is it possible to have the dimensions of the hat unfolded? because I already used 2 balls and I am at row 33…
LikeLiked by 1 person
The gauge is given in the pattern. The first row should be 31cm
LikeLike
hi! Reading through the comments I was a bit confused when you said the first row should be 31 cm. In the text it says that the first row of 70 has a length of 36 cm.
Is the initial length of the chain longer than the first row?
I am new to crocheting and would appreciate a reply 🙂
LikeLike
Hej, vilken fin mössa du gjort. Ska bli så kul att få sätta händerna i detta mössprojekt.
Skulle dock vilja veta vilka färger du använt på era mössor på fotot då ni röker lakritspipa-inte helt enkelt att hitta rätt färger på deras scheejpes färgkarta…
Är det trä och lowry?
Tack
LikeLiked by 1 person
Lowry and Wood.
LikeLike
Hi Martin, I just started crocheting according to the pattern, but I have a question about the amount of yarn. The patterns says 3 balls of 50 gram. I am using Merino Soft like you but I finished my first ball in the middle of row 28. Is it just me or am I never gonna make that with just 3 balls? Am I doing something wrong (the gauge is right) or is it just an error in the pattern? Thank you! Lis
LikeLiked by 1 person
How long is your first row? It should have ca. 31cm. Something must be a bit strange…
LikeLike
I have no idea what we are doing differently. My first row is 38 cm long. When I make 4 rows of 22 stitches, to test the gauge, with a 4mm hook it is still almost 11,5 cm long. I do not crochet loosely, so I have no idea what my problem is..
LikeLike
Thank you for a great pattern. I’ve just started. Question for 1st row; do I crochet through one or two loops when I do the sc? I can see that the rest of the rows I go through blo for the ribbed effect.
LikeLiked by 1 person
I go through one loop
LikeLike
So excited to find this through the Scheepjes Facebook group! I bought yarn enough for 4 hats. Finished the first today. I crochet tight so used a 5 hook instead. My first row was 31cm as in the pattern. But the finished hat was very tight. I would like to make the other 3 but will need to add rows I think. Do you have a suggestion as to where I could add them? Looking forward to some advice. Thanks for the pattern!
LikeLiked by 1 person
Hej, I think it depends a little on how many rows you want/need to add.
LikeLiked by 1 person
I’m doing my second one now and am going to add two extra rows at each of the 4 straight sections on the top. Also, the bottom of my piece is wider than the top. I always thought I was a neat crocheter, but now I’m so envious of your finished work! Great job!
LikeLike
No worries! The stitch in blo gives a different tension. I made 8 hat’s and try all differ a little in size. Many people made a hat that was too big. A few made one which was too small. Gauge can be very various.
LikeLiked by 1 person
Thanks for your great pattern. I already made two of this awesome hats. The first hat I made from another Scheepjesyarn: River washed XL, color Avon that looks so nice with my orange-red wintercoat. I used hook 5 and started with 51 sc which made 30 cm. (at the end it turns out to be 28 cm but it fits, so better start with 55 sc.) Then in stead of 4 x 6 rows I hooked 4 x 4 rows and came out at 96 rows total. I also worked it out in a sketch with the gauge so pity I can’t leave a photo here.
The second hat I made was for my friend with Merino Soft, color Hogarth (605). Because it was very tight I started al over again with hook 5,5 and add more rows. Instead of the 4 x 6 I hooked 4 x 10. That made total 120 rows. Now it fits perfect. Many thanks for this great pattern.
LikeLiked by 1 person
Hey it looks like you have adapted this pattern with ease. Could you help me figure it out? I’m still a novice of crochet. This hat looks nice and I want to try my hand to make one. Please and thank you
LikeLiked by 1 person
Hello! This is a beautiful pattern. Is it okay to sell the finished items made with this pattern?
LikeLike
Hi Martin , thank you for sharing this pattern , I have made 3 for various members of the family and I have been able to vary the pattern with success for each one .. they are a little different in texture to yours as I have used Australian wool (8ply) and the brand I purchased has a coarse rather than smooth finish . Everyone is happy with their beanie and I am delighted !!!
LikeLiked by 1 person
I’m just starting but always worry about the making up stage at the end. I notice you have helpful photos on this free version but they aren’t included in the paid pdf, which is a shame as I prefer to work from the printed pattern.
Would you consider updating your paid for pdf? And if so, does the new version become available for those who already bought and downloaded the original?
Thanks of course though for including some photos regardless!
LikeLiked by 1 person
It is a good idea. The photos are not included in the paid pattern as most of the people want to have a „printer-friendly“ version of the pattern. I will see what I can do. Are you talking about the „technique pictures“? Or which pictures do you want in the pdf?
LikeLiked by 1 person
Ah, yes, I understand people may not be interested in general photos. The ones I mean are the 4 towards the end. To show you what it looks like before you fold it, how to fold it, how the stitches follow around and what it looks like once all the joining is done. Very specifically, the third of those 4 pictures where you’ve added little numbers and arrows to help, is very useful. If I could have only one photo, it would be that one!
LikeLike
Hi Martin, what’s your preferred method of joining new yarn in this pattern? Thanks, Alice
LikeLiked by 1 person
To be honest, in this pattern I just tie them together and turn the knot on the inside. It is totally invisible that way.
LikeLiked by 1 person
Hi Martin,
I was just wondering, to get the gauge 10×10 I had to use needle 4 (even though most of the times I need a bigger one). But now I am working my way trough the pattern it seems a bit small. Can you tell me how many cm it should be from bottom till point?
Annet
LikeLike
Funny, now that I am working on this hat I see it posted everywhere! The excitement isn’t dying down, so you really hit this one off the charts. Thank you. So impressed that I bought the pattern to show my support. Love your mosaic patterns too. Following along with the new mosaic baby blanket in progress…waiting patiently!
LikeLiked by 1 person
Do you give us permission to sell finished products? I will happily give credit to the designer of the pattern.
LikeLike
Do you give us permission to sell finished products? I will happily give credit to the designer of the pattern.
Thanks
LikeLiked by 1 person
As long as it is a small, one (wo)man business. It is totally ok. If you run a million dollar company, I want my share… 😂
LikeLike
I’m almost done with row 18 and my hat looks different than the pictures. There’s way more space between the two little ridges. I’m using a single crochet in the back loops like the pattern says. Does anyone know why I have so much space in between each of the lines? It won’t let me post a pic for reference.
LikeLiked by 1 person
You may need to go down in needle size…
LikeLike
I have just made this up and have done something very wrong at the making up stage. I don’t see how I can attach pictures to show it but I will email you if that’s ok. Really annoyed as it’s literally the last thing to do bar turning it inside out. So annoyed.
LikeLiked by 1 person
I should follow up and add that it was a silly mistake on my end. In the final join, I joined the wrong bits together. Thanks to Martin for his patience with me! Lovely hat!
LikeLike
When I made the hat it took me a while to figure out how to join it all. The best way I can explain is that you made an “X” shape that will sit on the top of your head!
LikeLiked by 1 person
Yes that is totally correct!
LikeLike
I’m having difficulty getting the right gauge and could use some help. I’ve now made this hat three times with the same weighted yarn, but with different hook sizes each time and I’m feeling quite defeated. I picked out a yarn with a label hook size of 4.5. I have used a 5, 4.5, and a 4, and the size 4 hook made the biggest hat. I ended up using 6 balls of yarn. I’m a very tight crocheter and I’ve never had this problem before. When I made the gauge 10×10, I could not get the 24×22 any smaller than 12 cm. I even used the smaller hook I have (2.75) and that was still not 10cm. Otherwise I love the hat! Just had to make some on the fly adjustments
LikeLiked by 1 person
The pattern says to 2sc in blo in last stitch and chain one on row 53, but does that change at all for row 104? I have really enjoyed making this pattern thus far, and I’m almost finished! I did, however, reduce the amount of chains from 70 to 60 because I thought that might work better for the yarn type I was using (50% Merino, 25& Acrylic, 25% Nylon). Thank you for posting this free pattern. Looks very promising:)
LikeLiked by 1 person
I think I do not understand the question?! Row 54 is the same as row2. Row 55 is the same as row 3 and so on. Row 104 is the same as row 52.
LikeLike
Oh okay:) Thank you for clearing that up, I just wanted to double check and make sure that the 2sc was necessary instead of ending the row with a regular sc.
LikeLike
Thank you for this pattern! How long does it take you to crochet one hat?
LikeLiked by 1 person
Hi Martin. I purchased your pattern and I might have really messed up. I thought it was looking kind of big and guess the yarn difference is the problem. About an inch bigger. I’m going to finish anyway it will fit somebody my question is could you tell me how to make this smaller with only one roll maybe? I love this pattern and have done other designers patterns in the past but this top is what is so different. Can’t wait to get to finish it off. But if you could tell me how to make smaller for a child or woman I would appreciate it. Fantastic pattern and will be warm. Thank you for this design and so happy to have found you and your designs. Just starting yours.
LikeLiked by 1 person
If you just want to make it shorter, like with one roll up you just have to adjust the starting chain with less stitches (and every following row according to the starting chain). If you want your hat to be smaller in circumference you have to take a smaller hook.
LikeLike
Thank you for this pattern….I just wanted a fisherman type touque and this I’d perfect…we’ll really use this in Northern Canada!
LikeLiked by 1 person
Hi! Do you think it is possible to make this pattern with a 4mm hook? What will it do to the size of the hat? I am a bit of a newby in the world of patterns and hooks. Thanks!
LikeLike
Your pattern is beautifully done, congratulations to you
LikeLiked by 1 person
Hi Martin,
I love this pattern! I had to make a last minute Christmas present for a co-worker, and I thought that a hat would be perfect for him! Since it was last minute, I had to use yarn I had at home, and I only have worsted weight. I used one and a half skeins of Red Heart Soft with an I hook, and used a chain 45 to start, and the hat came out to the perfect size. I just wanted to thank you for a lovely pattern that was so easy to follow.
Christine
LikeLiked by 1 person
Hi Martin, thanks for sharing your pattern. I’m using an Aran yarn with 5mm hook. Can you please give me the measurement for how long the finished piece should be, prior to joining, so I can adjust? Thanks, Nicky
LikeLiked by 1 person
Hello! Do you have a suggestion of a stitch count for the starting chain to make a hat with a single brim? I have some lovely yarn 225m which won’t be enough for a double brim (but I’m sure I could do a single brim?) … I’m not so good at judging these things …
LikeLiked by 1 person
Ich finde die Mütze so cool, ich habe sie eben gekauft bei Ravelry.
Nana
LikeLiked by 1 person
Thanks for this pattern! It was easy to follow and turned out well. I don’t think i have a particularly small head, but I’ve tried using the hook size suggested in the pattern, but it turned out MUCH better when I used a size F hook. A tutorial would be extremely helpful, though. both times I got a little confused on joining together the humps that make the top of the hat.
– JJ
LikeLike
I really like this pattern its easy and quick. its nice to find a cute beanie pattern thats easy enough for my to do!
LikeLike
I never crochet! I know how to, it just never appealed as much to me as knitting and it never felt as rewarding. Until I saw the article with your projects and designs in Stickat & sånt and now found this hat. Looks perfect and I will surely give it a go. Thank you for sharing and I will by a copy on Ravelry!
LikeLiked by 1 person
Hi Martin, super thanks for this pattern!
It took me a while to get the right gauge (maybe because it is super stretchy yarn?). Eventually I used a 4mm hook and chain 60 in the beginning. In that way the first row was 31cm. Will post a picture on Insta when it’s finished 🙂
LikeLiked by 1 person
Tack för mönstret! Jag delade allt på tre och gjorde en pytteversion till min novemberbebis som blev supergullig!
LikeLiked by 1 person
Yes I am attempting this hat. It looks like a more polished hat at completion. I’m excited to finish. Thanks for sharing!
LikeLiked by 1 person