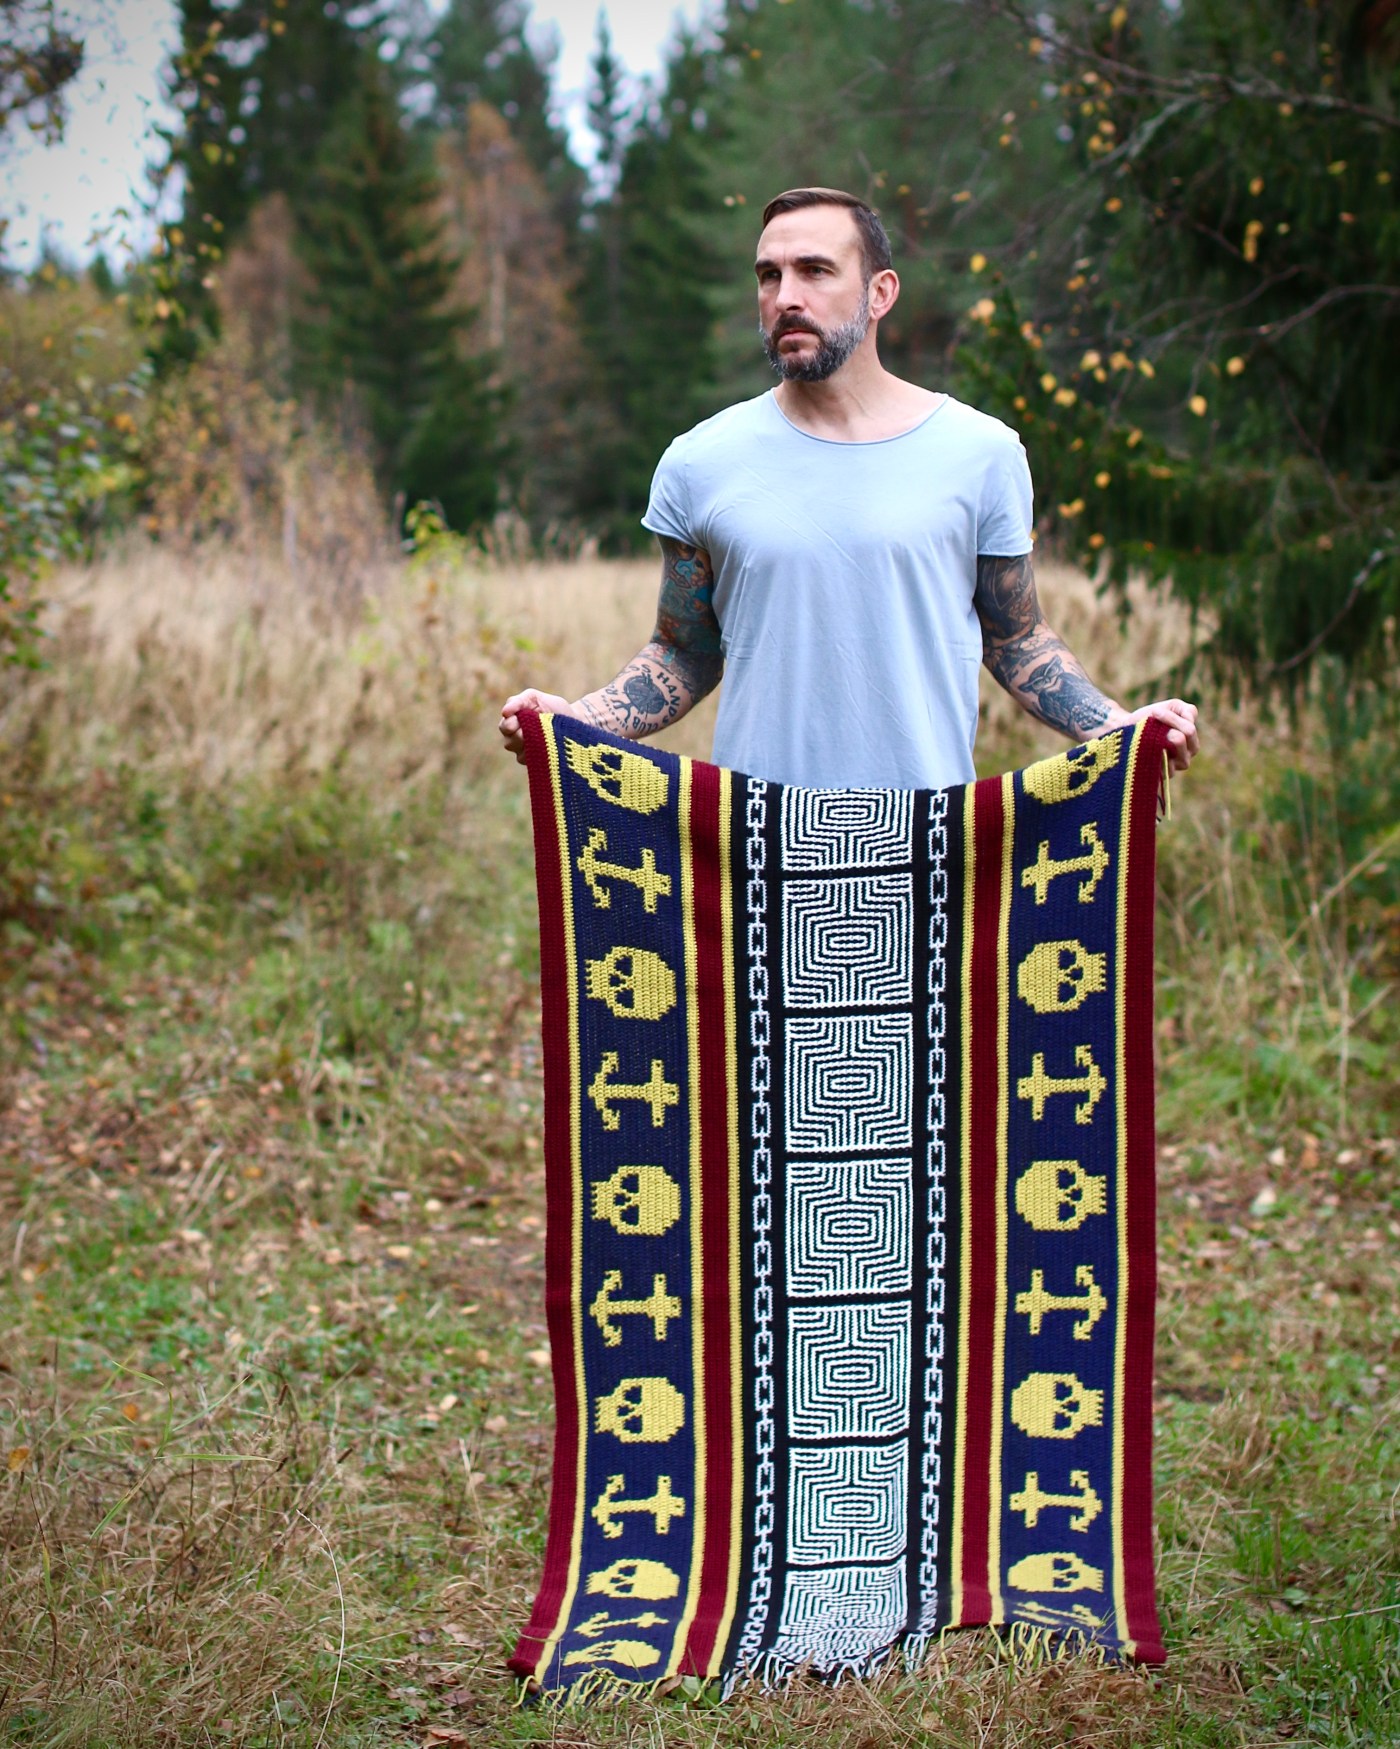
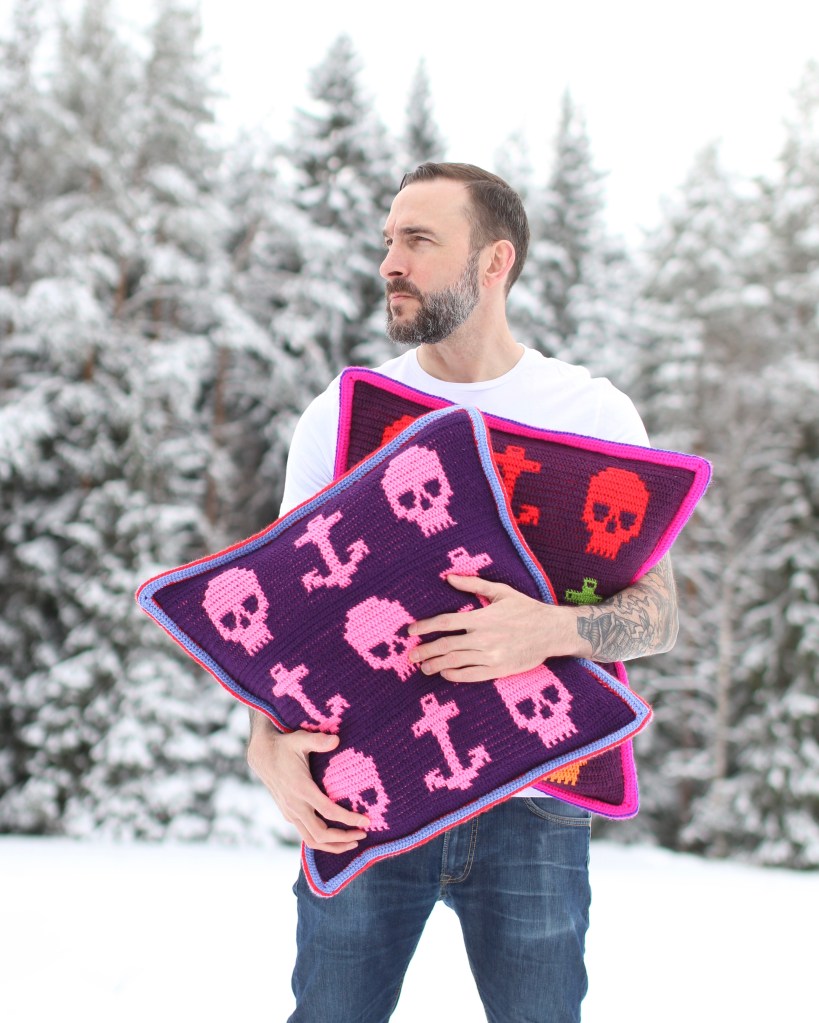
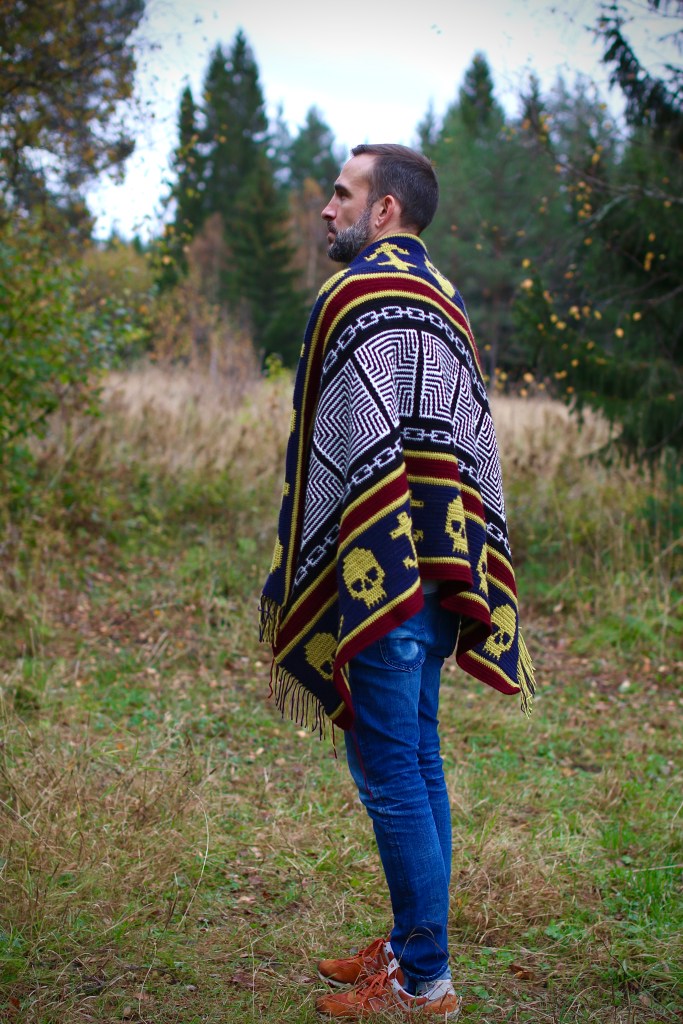
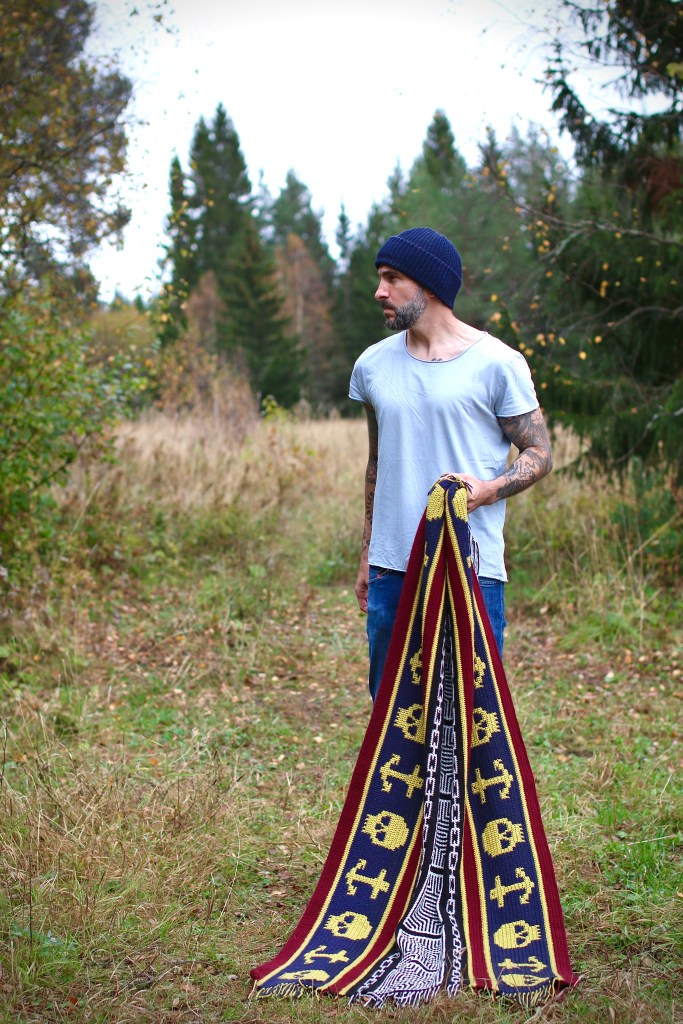
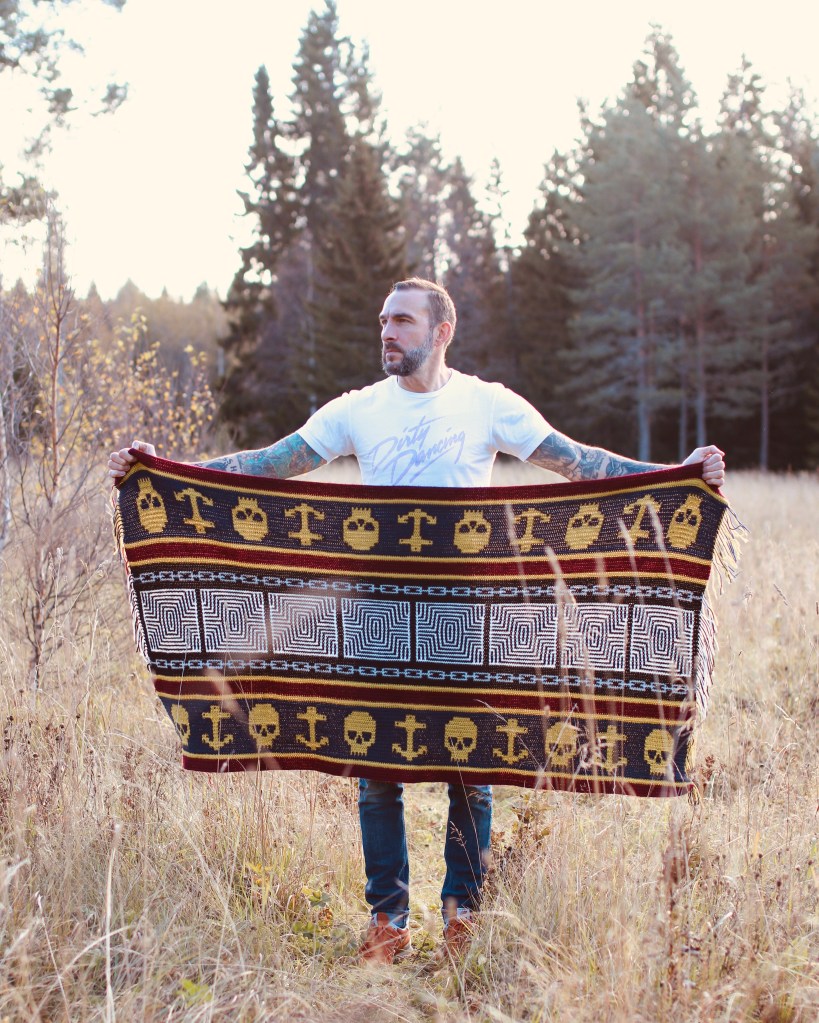
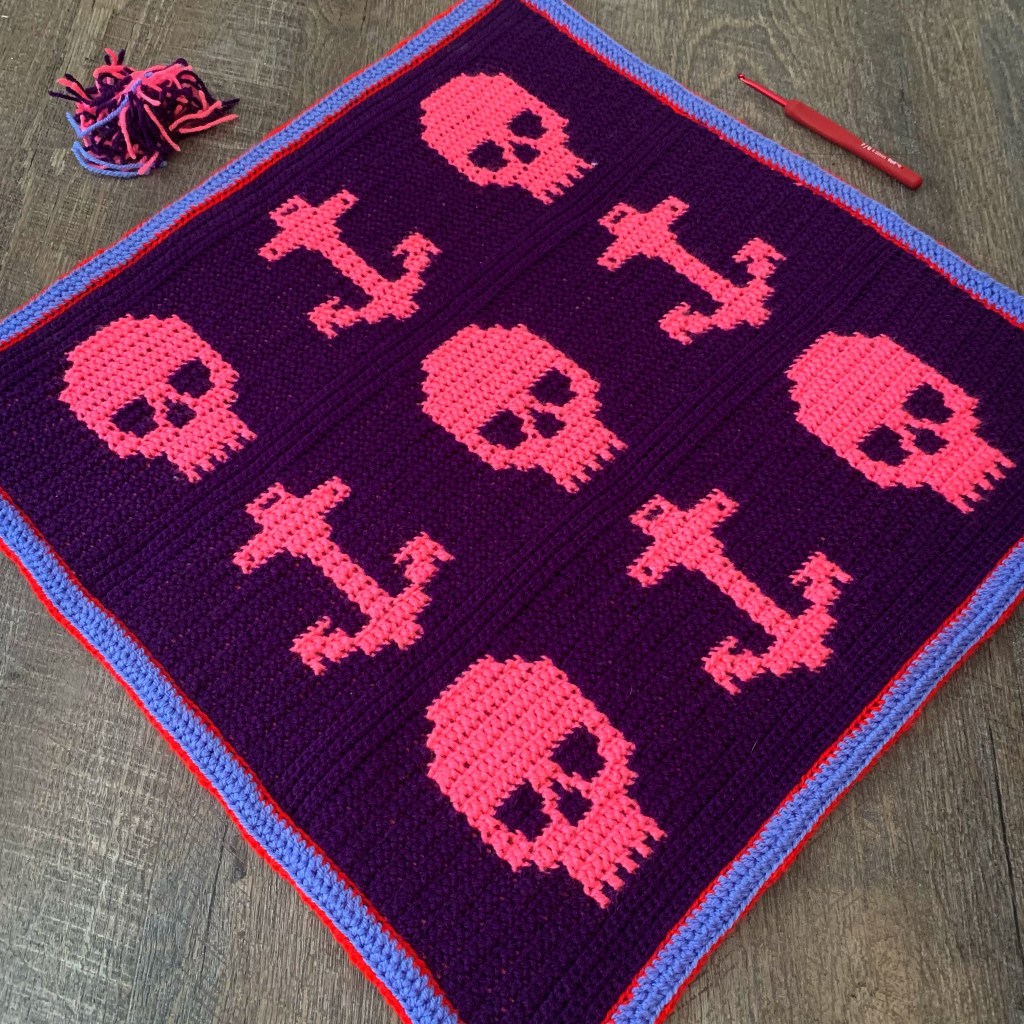
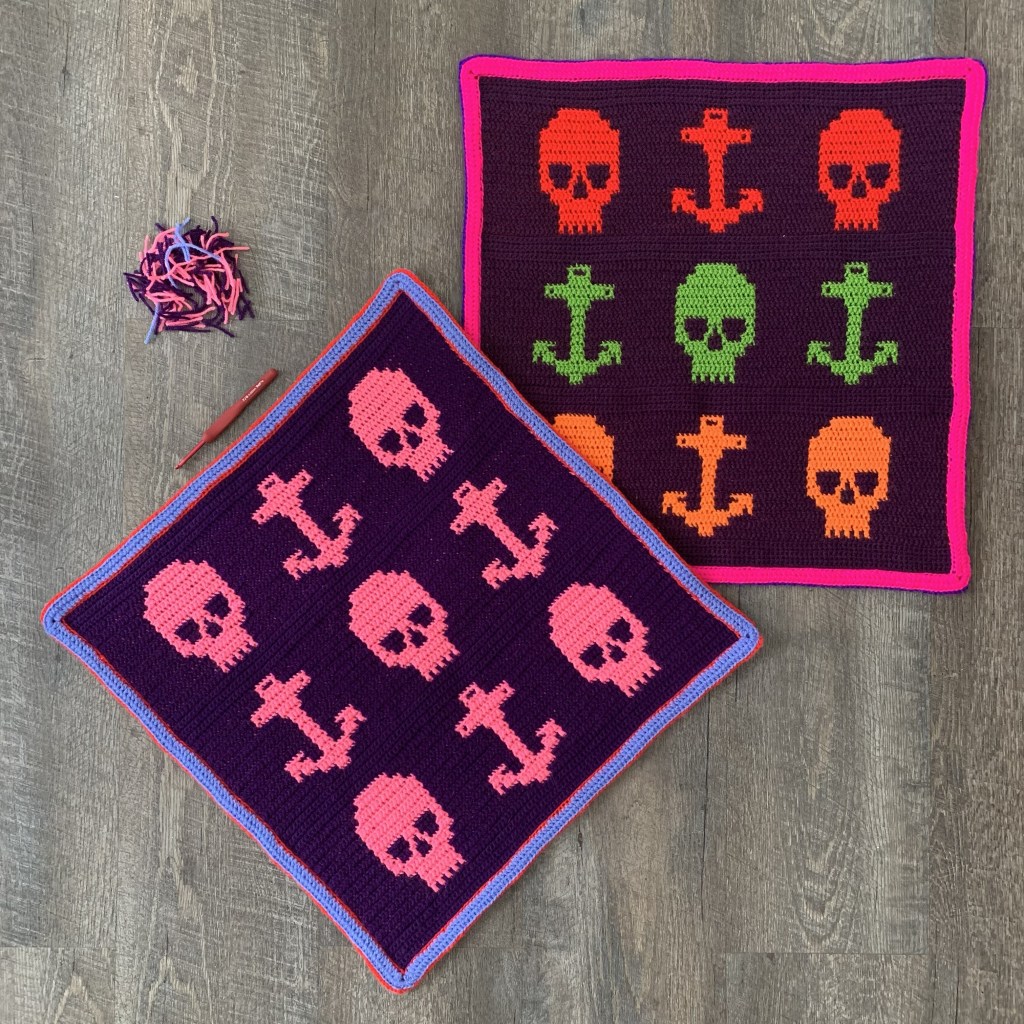
Finally I can present the Skulls & Anchor mosaic pattern.
I decided to write this pattern in a different way and write down the motives separately. I hope that this gives you the possibility to use the motives in different ways and in different makes.
For those of us who prefer to follow a pattern from row 1 to the end. I did put together two patterns that use the motives in different ways.
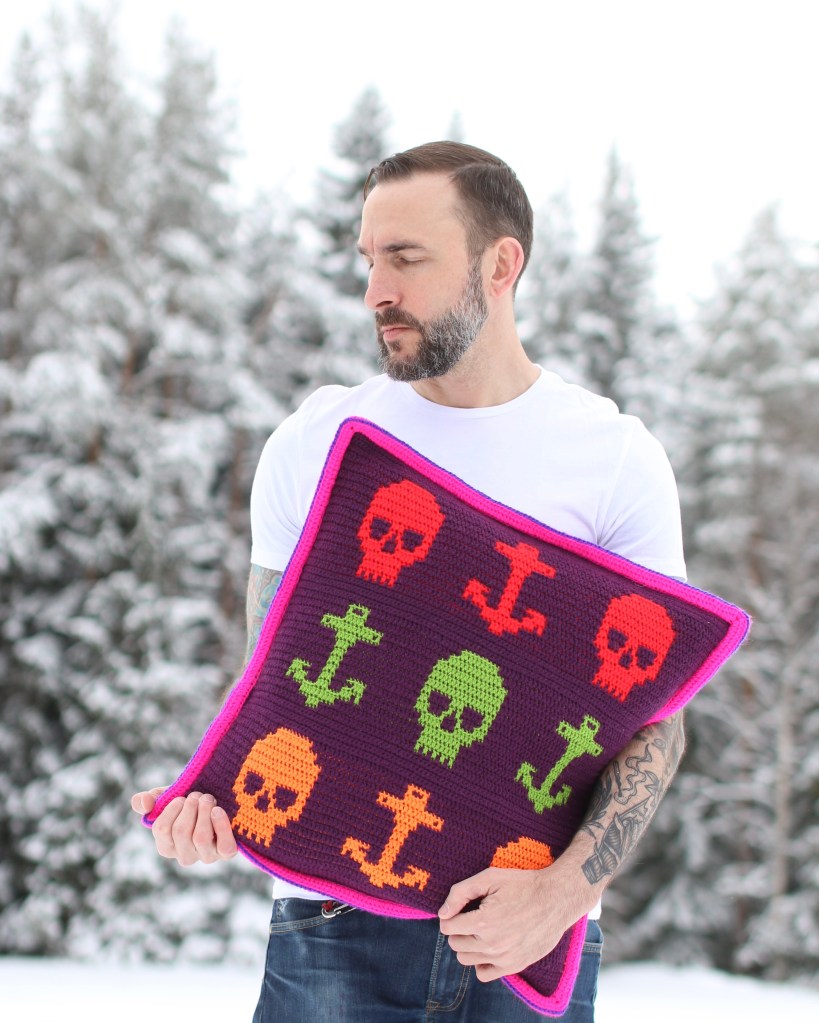
A cushion that uses the skulls and anchors which can be found for free if you scroll down a little.
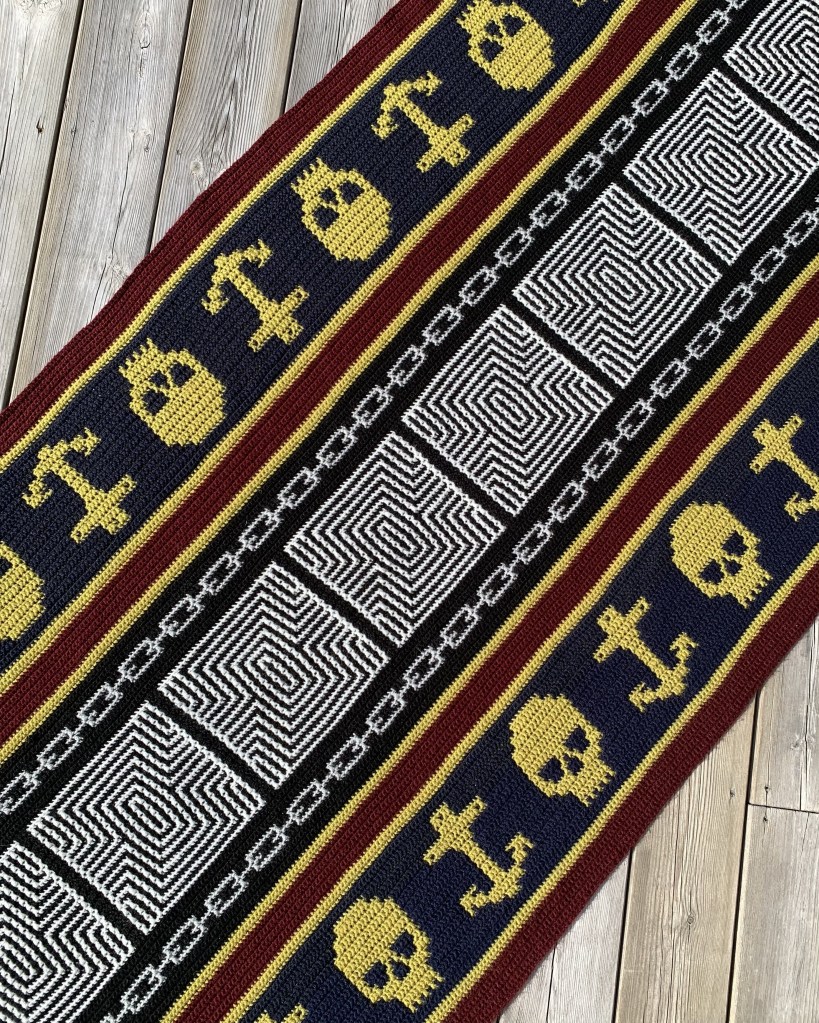
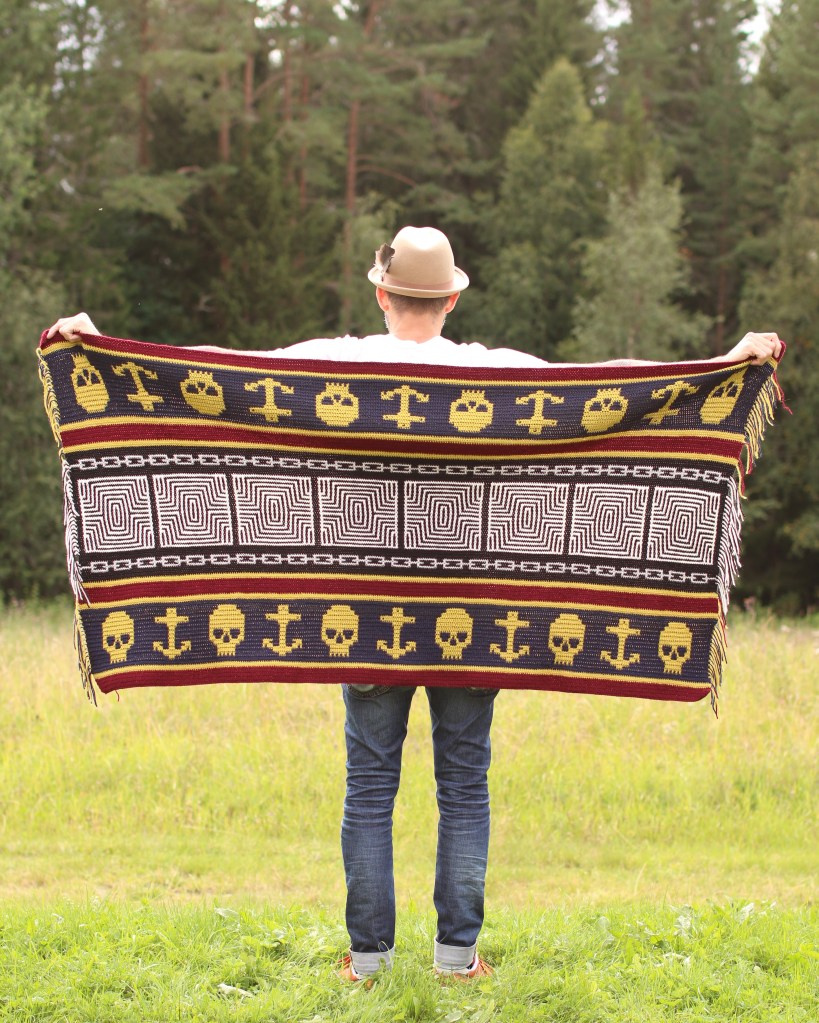
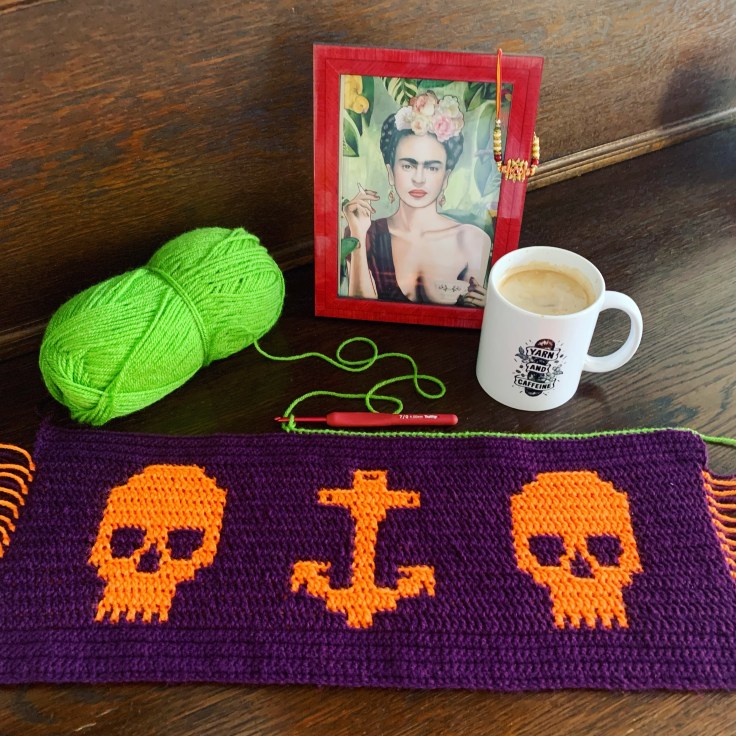
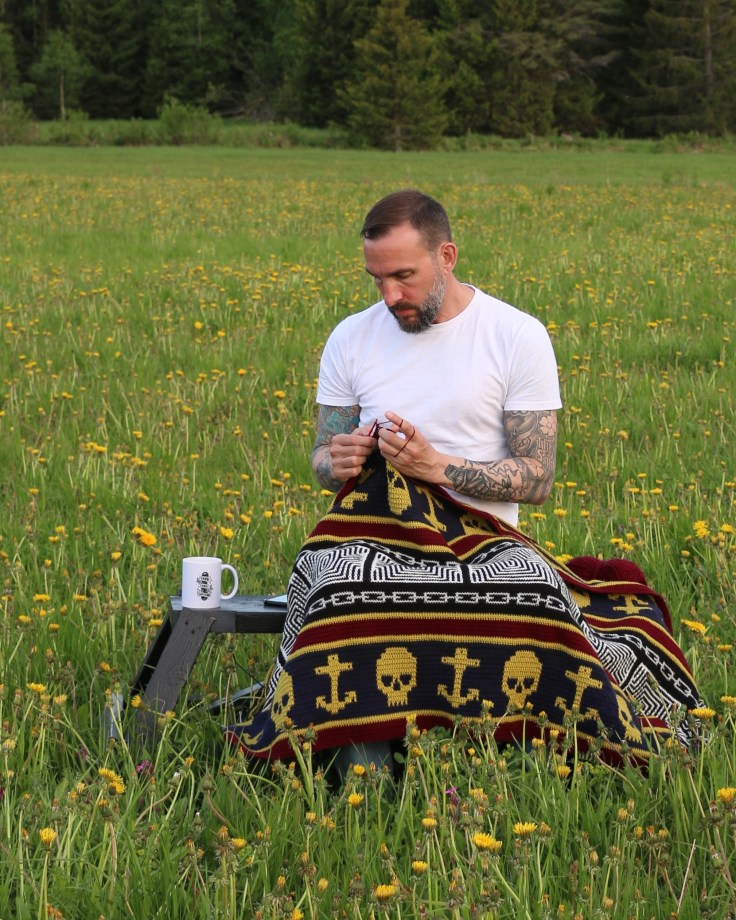
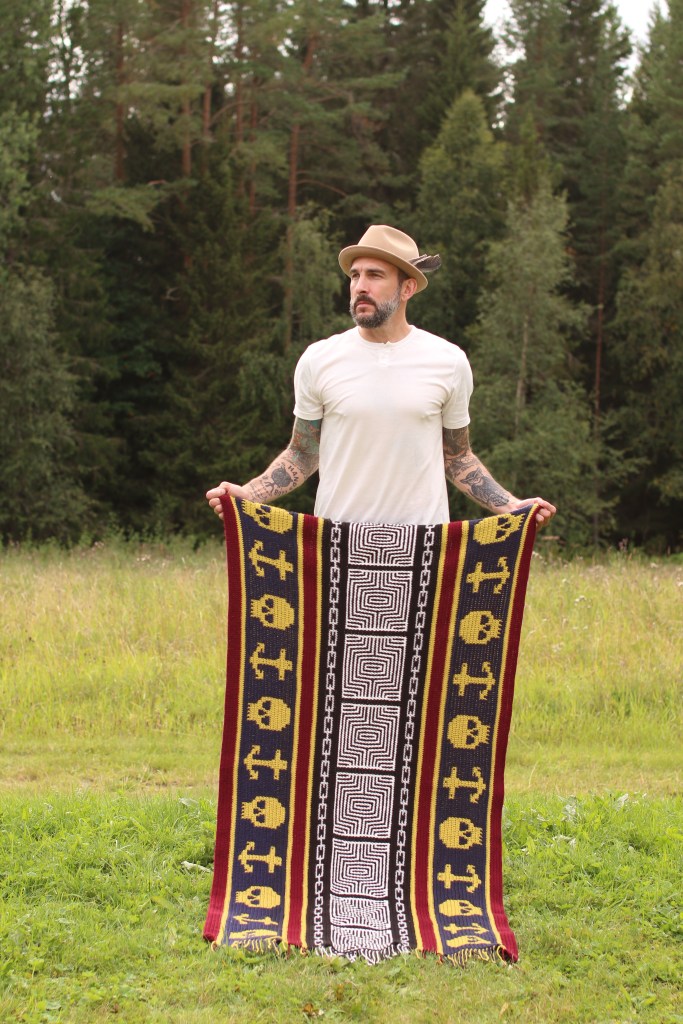
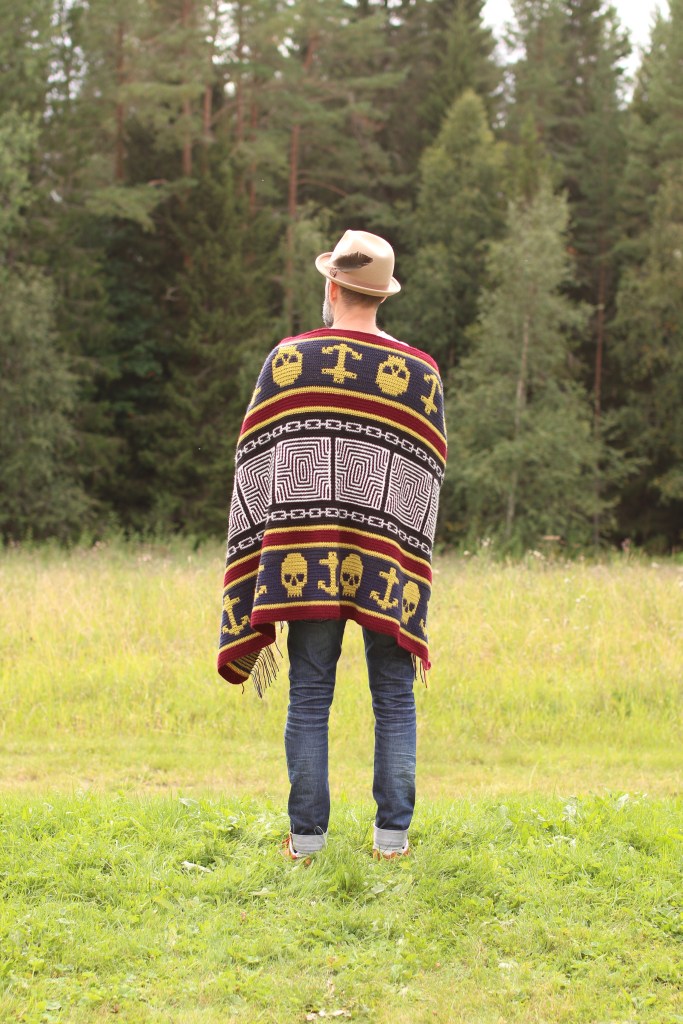
And a wrap/blanket that uses 4 more motives (the X, chains, upside down skulls and upside down anchors) which is available as a ready to print PDF pattern on Ravelry. HERE HERE HERE
This pattern includes even the cushion as a PDF and all motives in a separate PDF. The pattern is available in English and Dutch.
Both makes are using SCHEEPJES Colour Crafter which can be bought at your local yarn shop: Scheepjes Dealers . If you do not have the possibility to buy local, you can order your Scheepjes yarn at Wool Warehouse or Jimmy Beans Wool
A big, big thank you to all testers, translators and helping hands!
I hope that you try to be creative with the different options that those motives give you.
Please use the hashtags #martinupnorth #restlesshandsclub #scheepjescolourcrafter when sharing your projects on social media or simply tag @martin_up_north on your social media.
ENGLISH VERISON
The Skull & Anchor cushion
Martin Up North (www.martinupnorth.com)
Material:
4,00 mm hook
Scheepjes Colour Crafter 100% Premium Acrylic (Anti Pilling) 100grams = 300meters
Yarn A 2 balls
Yarn B 1ball
Border
Yarn C 1ball
Yarn D 1 ball
Gauge:
10cm x10cm =21rows x 19st
Size:
50cm x 50cm without border
Abbreviations (US terms)
ch(s) chain or chain stitches
ch-sp chain space
ss slip stitch
sc single crochet
dc double crochet
hdc half double crochet
sthdc standing half double crochet.
blo back loop only: insert hook in back loop only
flo front loop only: insert hook in front loop only
rep repeat
ws wrong side
rs right side
st(s) stitch(es)
mosaicdc double crochet worked in flo in the second row beneath (same color row)
beg beginning
Pattern notes
- All instructions for the motifs can be found in the motifs file. You need both the cushion and motif file to make the cushion.
- Read the whole pattern before you start.
- The pattern is partly worked in the mosaic technique and partly in sc rows that are crocheted on both sides. (turn at the end of each row)
Pattern notes mosaic parts
- When working in the mosaic parts the yarn is cut at the end of every row.
- The mosaic part is worked on the rs only. You do not turn work when working in the mosaic parts.
- The pattern is using 2 different motives: skull and anchor.
- The motives can also be used separately, that way you can adapt, adjust or create your very own pattern. Be creative.
- First and last stitch in mosaic rows is always a sc worked through both loops.
- The stitches between the motives are, in this pattern filled with mosaicdcs in main color and sc in blo in contrast color. That way you get parts in main color only between the motives.
- When working with motive colour (even numbered rows), stitches before, between and after the mosaic motives are always worked as sc in blo.
- When working in main color (odd numbered rows), stitches before, between and after the mosaic motives are always worked as mosaicdc.
- Every first row of every mosaic part starts with a base row that is: 101sc, ch1, fasten off.
- Every second row of every mosaic part is: 1sc, 99sc in blo, 1sc, ch1 fasten off.
- Do not cut yarn after the last row in mosaic parts.
- Examples for rows are in the written pattern.
Pattern
With yarn A, 4.00mm hook
Starting part
Ch102
Row 1 1sc in second st from hook, 99sc, 1sc in last ch, turn, ch1, [101 sc]
Row 2 101sc, ch1, turn. (101sc)
Row 3 to row 5 rep row 2
First mosaic part.
Go on with yarn A.
Row 1 is the base of the first mosaic part and uses sc through both loops. It is marked with red coloured squares in the charts.
This part is built up like this:
1sc, 11st, skull, 9st, anchor, 9st, skull, 11st, 1sc.
Odd numbered rows are crocheted in yarn A (main color)
Even numbered rows are crocheted in yarn B (motive color)
Example rows:
red = skull
blue= anchor
Row 1 1sc, 11sc, 19sc, 9sc, 21sc, 9sc, 19sc, 11sc, 1sc, ch1, fasten off. [101 sc]
Row 2 join yarn B in first st, 1sc, 11sc in blo, 19sc in blo, 9sc in blo, 21sc in blo, 9sc in blo, 19sc in blo, 11sc, 1sc, ch1, fasten off. [2 sc, 99 sc in blo]
As you can see in the first two rows, the parts are “joining” each other. In row 1 you simply crochet 101sc. It is important to understand that the whole chart plus the 9 stitches between them plus all stitches in the beginning and the end of every row must be crocheted.
Row 3 join yarn A in first st, 1sc, 11mosaicdc, 5mosaicdc, (1sc in blo, 1mosaicdc) 5 times, 4mosaicdc, 9mosaicdc, 9mosaicdc, 3sc in blo, 9mosaicdc, 9mosaicdc, 5mosaicdc, (1sc in blo, 1 mosaicdc) 5 times, 4mosaicdc, 11mosaicdc, 1sc, ch1, fasten off. [2 sc, 13 sc in blo, 86 mosaicdc]
Row 4 join yarn B in first st, 1sc, 11sc in blo, 5sc in blo, (1mosaicdc, 1 sc in blo) 5times, 4sc in blo, 9sc in blo, 9sc in blo, 3mosaicdc, 9sc in blo, 9sc in blo, 5sc in blo, (1mosaicdc, 1 sc in blo) 5times, 4sc in blo, 11sc in blo, 1sc ch1, fasten off. [2 sc, 86sc in blo, 13 mosaicdc]
Crochet the whole part to the end of chart.
Do not cut yarn after the last mosaic part row. Turn work.
Part between mosaic parts
Go on with yarn A. On ws.
Row 1 101sc, ch1, turn. [101sc]
Row2 to 5 rep row 1.
Do not cut yarn after row 5.
Second mosaic part
Go on with yarn A.
Row 1 is the base of the first mosaic part and uses sc through both loops. It is marked with red coloured squares in the charts.
This part is built up like this:
1sc, 10st, anchor, 9st, skull, 9st, anchor, 10st, 1sc.
Odd numbered rows are crocheted in yarn A (main color)
Even numbered rows are crocheted in yarn B (motive color)
Example rows:
red = skull
blue = anchor
Row 1 1sc, 10sc, 21sc, 9sc, 19sc, 9sc, 21sc, 10sc, 1sc, ch1, fasten off. [101 sc]
Row 2 join yarn B in first st, 1sc, 10sc in blo, 21sc in blo, 9sc in blo, 19sc in blo, 9sc in blo, 21sc in blo, 10sc, 1sc, ch1, fasten off. [2 sc, 99 sc in blo]
As you can see in the first two rows, the parts are “joining” each other. In row 1 you simply crochet 101sc. It is important to understand that the whole chart plus the 9 stitches between them plus all stitches in the beginning and the end of every row must be crocheted.
Row 3 join yarn A in first st, 1sc, 10mosaicdc, 9mosaicdc, 3sc in blo, 9mosaicdc, 9mosaicdc, 5mosaicdc, (1sc in blo, 1mosaicdc) 5 times, 4mosaicdc, 9mosaicdc, 9mosaicdc, 3sc in blo, 9mosaicdc, 10mosaicdc, 1sc, ch1, fasten off. [2 sc, 11 sc in blo, 88 mosaicdc]
Row 4 join yarn B in first st, 1sc, 10sc in blo, 9sc in blo, 3mosaicdc, 9sc in blo, 9sc in blo, 5sc in blo, (1mosaicdc, 1 sc in blo) 5 times, 4sc in blo, 9sc in blo, 9sc in blo, 3mosaicdc, 9sc in blo, 10sc in blo, 1sc ch1, fasten off. [2 sc, 88sc in blo, 11 mosaicdc]
Crochet the whole part to the end of chart.
Do not cut yarn after the last mosaic part row. Turn work.
Rep part between mosaic parts and first mosaic part one more time.
Finishing part
Go on with yarn A.
Row 1 101sc, ch1, turn. [101 sc]
Row 2 to row 4 rep row 1.
Row 5 101sc, ch1, fasten off. [101 sc]
Border:
Double border: Tie loose ends together two and two with a double knot and cut them to approx. 3 cm (ca. 1,7in).
With yarn C and 5mm hook.
With rs facing. Join yarn C in any stitch. Ss around with 101 sts on every side. The ss are crocheted with thread on the backside. Join round with ss in first ss. Fasten off.
With yarn D and 4.50 mm hook.
WS Border Edge
With WS facing, beg in first ss after right-angle corner. Working in the back bump of the slip stitches.
Round 1 Sthdc in first ss, hdc in same ss, (99hdc, 2hdc in last ss, ch2, 2hdc in first ss on next side) 3 times, 99hdc, 2hdc in last ss, ch2, ss to standing hdc to join. [103 hdc on each side, 4 ch2-sps]
Round 2 Ch2 (counts as first hdc), 102hdc, ((2hdc, ch2, 2hdc) in ch2-sp, 103hdc) 3 times, (2hdc, ch2, 2hdc), ss to second ch of beg ch-2, fasten off. [107 hdc on each side, 4 ch2-sps]
RS Border Edge
With RS facing, working in blo of each ss, with Yarn D work as for WS Border Edge.
Join RS and WS Border Edges
With RS facing, hold RS and WS Border Edges together, align hdc stitches.
Join Yarn C with ss in ch2-sp at any corner, ch1, (working through both inner loops of hdc stitches) (107ss, 2ss in ch2-sp) 4 times, join with invisible join, fasten off. [436 ss]
Sew the cushion sized square on a pillow cover 50cm x 50cm.
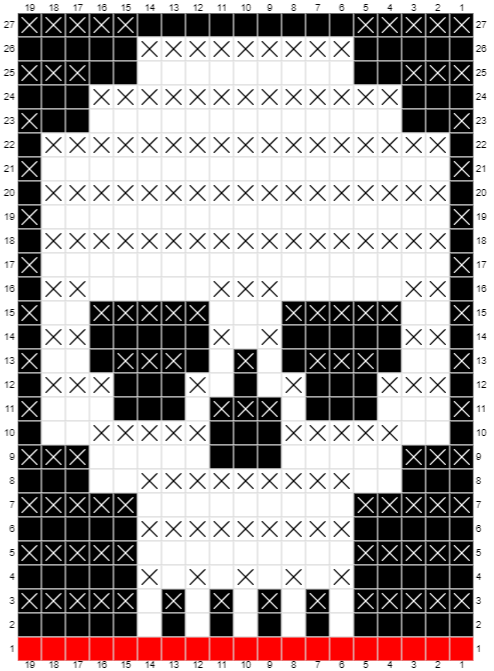
The Skull and Anchor Motif
Pattern notes mosaic parts
• When working in the mosaic parts the yarn is cut at the end of every row.
• The mosaic part is worked on the rs only. You do not turn work when working in the mosaic parts.
• You will find 6 different motives: skull, anchor, chain, X, upside-down skull and upside-down anchor.
• The motives can be used separately, that way you can adapt, adjust or create your very own pattern. Be creative.
• Every first row of every mosaic part starts with a base row.
• The base row is marked red in the chart and has only sc.
• Every second row of every mosaic part is scs in blo only.
Chart notes:
 square -  sc in blo
 square with cross - mosaicdc
 red square - sc
The Skull
Based on 19 stitches in yarn A (row 1).
Row 2 yarn B, 19sc in blo.
Row 3 yarn A, 5mosaicdc, (1sc in blo, 1mosaicdc) 5 times, 4mosaicdc.
Row 4 yarn B, 5sc in blo, (1mosaicdc, 1 sc in blo) 5 times, 4sc in blo.
Row 5 yarn A, 5mosaicdc, 9sc in blo, 5mosaicdc.
Row 6 yarn B, 5sc in blo, 9mosaicdc, 5sc in blo.
Row 7 yarn A, 5mosaicdc, 9sc in blo, 5mosaicdc.
Row 8 yarn B, 5sc in blo, 9mosaicdc, 5sc in blo.
Row 9 yarn A, 3mosaicdc, 13sc in blo, 3mosaicdc.
Row 10 yarn B, 3sc in blo, 5mosaicdc, 3sc in blo, 5mosaicdc, 3sc in blo.
Row 11 yarn A, 1mosaicdc, 7sc in blo, 3mosaicdc, 7sc in blo, 1mosaicdc.
Row 12 yarn B, 1sc in blo, 3mosaicdc, (3sc in blo, 1mosaicdc) 3 times, 2mosaicdc, 1sc in blo.
Row 13 yarn A, 1mosaicdc, 3sc in blo, 3mosaicdc, 2sc in blo, 1mosaicdc, 2sc in blo, 3mosaicdc, 3sc in blo, 1mosaicdc.
Row 14 yarn B, 1sc in blo, 2mosaicdc, 5sc in blo, 1mosaicdc, 1sc in blo, 1mosaicdc, 5sc in blo, 2mosaicdc, 1sc in blo.
Row 15 yarn A, 1mosaicdc, 2sc in blo, 5mosaicdc, 3sc in blo, 5mosaicdc, 2sc in blo, 1mosaicdc.
Row 16 yarn B, 1sc in blo, 2mosaicdc, 5sc in blo, 3 mosaicdc, 5sc in blo, 2mosaicdc, 1sc in blo.
Row 17 yarn A, 1mosaicdc, 17sc in blo, 1mosaicdc.
Row 18 yarn B, 1sc in blo, 17 mosaicdc, 1sc in blo.
Row 19 yarn A, 1mosaicdc, 17 sc in blo, 1mosaicdc.
Row 20 yarn B, 1sc in blo, 17 mosaicdc, 1sc in blo.
Row 21 yarn A, 1mosaicdc, 17sc in blo, 1mosaicdc.
Row 22 yarn B, 1sc in blo, 17mosaicdc, 1sc in blo.
Row 23 yarn A 1mosaicdc, 17 sc in blo, 1mosaicdc,
Row 24 yarn B 3sc in blo, 13mosaicdc, 3sc in blo.
Row 25 yarn A 3mosaicdc, 13 sc in blo, 3mosaicdc.
Row 26 yarn B 5sc in blo, 9mosaicdc, 5sc in blo.
Row 27 yarn A 5mosaicdc, 9sc in blo, 5mosaicdc.
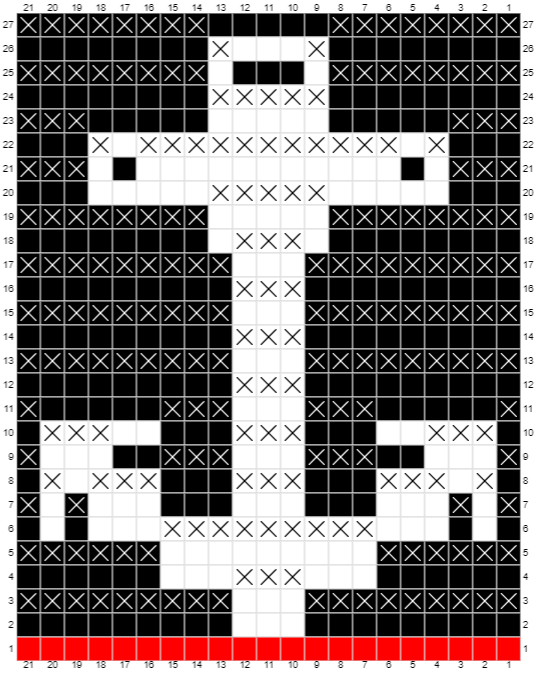
The Anchor

Based on 21 stitches in yarn A (row 1).
Row 2 yarn B 21sc in blo
Row 3 yarn A, 9mosaicdc, 3sc in blo, 9mosaicdc.
Row 4 yarn B, 9sc in blo, 3mosaicdc, 9sc in blo.
Row 5 yarn A, 6mosaicdc, 9sc in blo, 6mosaicdc.
Row 6 yarn B, 6sc in blo, 9mosaicdc, 6sc in blo.
Row 7 yarn A, 1mosaicdc, 1sc in blo, 1mosaicdc, 15sc in blo, 1mosaicdc, 1sc in blo, 1mosaicdc.
Row 8 yarn B, 1sc in blo, 1mosaicdc, 1sc in blo, (3mosaicdc, 3sc in blo) 2 times, 3mosaicdc, 1sc in blo, 1mosaicdc, 1sc in blo.
Row 9 yarn A, 1mosaicdc, 5sc in blo, 3mosaicdc, 3sc in blo, 3mosaicdc. 5sc in blo, 1mosaicdc.
Row 10 yarn B, 1sc in blo, 3mosaicdc, 5sc in blo, 3mosaicdc, 5sc in blo, 3mosaicdc, 1sc in blo.
Row 11 yarn A, 1mosaicdc, 5sc in blo, 3mosaicdc, 3sc in blo, 3mosaicdc, 5sc in blo, 1mosaicdc.
Row 12 yarn B, 9sc in blo, 3mosaicdc, 9sc in blo.
Row 13 yarn A, 9mosaicdc, 3sc in blo, 9mosaicdc.
Row 14 yarn B, 9sc in blo, 3mosaicdc, 9sc in blo.
Row 15 yarn A, 9mosaicdc, 3sc in blo, 9mosaicdc.
Row 16 yarn B, 9sc in blo, 3mosaicdc, 9sc in blo.
Row 17 yarn A, 9mosaicdc, 3sc in blo, 9mosaicdc.
Row 18 yarn B, 9sc in blo, 3mosaicdc, 9sc in blo.
Row 19 yarn A, 8mosaicdc, 5sc in blo, 8mosaicdc.
Row 20 yarn B, 8sc in blo, 5mosaicdc, 8sc in blo.
Row 21 yarn A, 3mosaicdc, 15sc in blo, 3mosaicdc.
Row 22 yarn B, 3sc in blo, 1mosaicdc, 1sc in blo, 11mosaicdc, 1sc in blo, 1mosaicdc, 3sc in blo.
Row23 yarn A, 3mosaicdc, 15sc in blo, 3mosaicdc.
Row 24 yarn B, 8sc in blo, 5mosaicdc, 8sc in blo.
Row 25 yarn A, 8mosaicdc, 5sc in blo, 8mosaicdc.
Row 26 yarn B, 8sc in blo, 1mosaicdc, 3sc in blo, 1mosaicdc, 8sc in blo.
Row 27 yarn A, 8mosaicdc, 5sc in blo, 8mosaicdc.
NEDERLANDSE VERSIE
The Skull & Anchor cushion
Martin Up North http://www.martinupnorth.com
Materiaal:
4,00 mm haaknaald
Scheepjes Colour Crafter 100% Premium Acryl (Anti Pilling) 100gram = 300meter
Garen A 2 bollen
Garen B 1 bol
Rand
Garen C 1bol
Garen D 1 bol
Stekenverhouding:
10cm x10cm =21rijen x 19steken
Grootte:
50cm x 50cm zonder rand
Afkortingen
l lossen
l-open losse opening
hv halve vaste
v vaste
st stokje
hst half stokje
sthst staand half stokje
al achterste lus: steek haaknaald enkel in de achterste lus
vl voorste lus: steek haaknaald enkel in de voorste lus
herh herhaal
AK achterkant
GK goede kant
s/stn steek/steken
mozaïekst stokje gehaakt in de voorste lus 2 rijen lager (zelfde kleur)
beg begin
Patroon notities
•Alle instructies voor de motieven staan in het motifs bestand. Je hebt zowel het cushion als motif bestand nodig om het kussen te maken.
•Lees het patroon volledig door voordat je start.
•Het patroon wordt deels in de mozaïektechniek gehaakt en deels in rijen vasten die aan beide kanten gehaakt wordt (je keert op het einde van elke rij).
Patroon notities voor de mozaïekdelen
•Als je aan het mozaïekdeel werkt dan wordt het garen op het einde van elke rij afgeknipt.
•Bij het mozaïekdeel werk je enkel aan de goede kant. Je keert je werk niet in het mozaïekdeel.
•Het patroon gebruikt 2 verschillende motieven: schedel en anker
•De motieven kunnen ook apart gebruikt worden, op die manier kan je aanpassingen doen of je eigen patroon creëren. Wees creatief.
•Eerste en laatste steek in een mozaïekrij is altijd een v door beide lussen.
•Steken tussen de motieven zijn, in dit patroon gevuld met mozaïekst in de hoofdkleur en v in al in de contrastkleur. Op deze manier krijg je delen met enkel de hoofdkleur tussen de motieven.
•Wanneer je met de motiefkleur werkt (even genummerde rijen) worden steken voor, tussen en na de mozaïek motieven altijd gehaakt als een v al.
•Wanneer je met de hoofdkleur werkt (oneven genummerde rijen) worden steken voor, tussen en na de mozaïek motieven altijd gehaakt als een mozaïekst.
•Elke eerste rij van elk mozaïekdeel begint met een basisrij die bestaat uit: 101v, 1l, hecht af.
•Elke tweede rij van elk mozaïekdeel bestaat uit: 1v, 99v al, 1v, 1l, hecht af.
•Knip het garen niet af na de laatste rij in mozaïekdelen.
•Voorbeelden voor rijen bevinden zich in het geschreven patroon.
Patroon
Met garen A, 4,00mm haaknaald
Startdeel
102l
Rij 1 1v in tweede s vanaf de naald, 99v, 1v in laatste l, keer, 1l, [101 v]
Rij 2 101v, 1l, keer. (101sc)
Rij 3 tot rij 5 herh rij 2
Eerste mozaïekdeel.
Ga door met garen A.
Rij 1 is de basis van het eerste mozaïekdeel en gebruikt v door beide lussen. Het is gemarkeerd met rood gekleurde vierkantjes in het schema.
Dit deel is als volgt opgebouwd:
1v, 11stn, schedel, 9stn, anker, 9stn, schedel, 11stn, 1v.
Oneven genummerde rijen worden gehaakt met garen B (hoofdkleur)
Even genummerde rijen worden gehaakt met garen A (motiefkleur)
Voorbeeldrijen:
rood = schedel
blauw = anker
Rij 1 1v, 11v, 19v, 9v, 21v, 9v, 19v, 11v, 1v, 1l, hecht af. [101 v]
Rij 2 hecht garen B aan in eerste s, 1v, 11v al , 19v al, 9v al, 21v al, 9v al, 19v al, 11v, 1v, 1l, hecht af. [2 v, 99 v al]
Zoals je kan zien in de eerste 2 rijen, zijn de delen met elkaar “verbonden”. In rij 1 haak je eenvoudigweg 101v. Het is belangrijk om te begrijpen dat het volledige schema plus de 9 steken ertussen, plus alle steken aan de start en het einde van elke rij gehaakt moeten worden.
Rij 3 hecht garen A aan in eerste s, 1v, 11mozaïekst, 5mozaïekst, (1v al, 1mozaïekst) 5 keer, 4mozaïekst, 9mozaïekst, 9mozaïekst, 3v al, 9mozaïekst, 9mozaïekst, 5mozaïekst, (1v al, 1mozaïekst) 5 keer, 4mozaïekst, 11mozaïekst, 1v, 1l, hecht af. [2 v, 13 v al, 86 mozaïekst]
Rij 4 hecht garen B aan in eerste s, 1v, 11v al, 5v al, (1mozaïekst, 1v al) 5 keer, 4v al, 9v al, 9v al, 3mozaïekst, 9v al, 9v al, 5v al, (1mozaïekst, 1 v al) 5 keer, 4v al, 11v al, 1v, 1l, hecht af. [2 v, 86 v al, 13 mozaïekst]
Haak het volledige deel tot het einde van het schema.
Knip het garen niet af na de laatste rij van het mozaïekdeel. Keer je werk.
Deel tussen de mozaïekdelen
Ga door met garen A. Aan de AK.
Rij 1 101v, 1l, keer. [101v]
Rij 2 tot 5 herh rij 1.
Knip garen niet af na rij 5
Tweede mozaïekdeel
Ga door met garen A.
Rij 1 is de basis van het eerste mozaïekdeel en gebruikt v door beide lussen. Het is gemarkeerd met rood gekleurde vierkantjes in het schema.
Dit deel is als volgt opgebouwd:
1v, 10stn, anker, 9stn, anker, 9stn, anker, 10stn, 1v.
Oneven genummerde rijen worden gehaakt met garen B (hoofdkleur)
Even genummerde rijen worden gehaakt met garen A (motiefkleur)
Voorbeeldrijen:
rood = schedel
blauw = anker
Rij 1 1v, 10v, 21v, 9v, 19v, 9v, 21v, 10v, 1v, 1l, hecht af. [101 v]
Rij 2 hecht garen B aan in eerste s, 1v, 10v al, 21v al, 9v al, 19v al, 9v al, 21v al, 10v, 1v, 1l, hecht af. [2 v, 99 v al]
Zoals je kan zien in de eerste 2 rijen, zijn de delen met elkaar “verbonden”. In rij 1 haak je eenvoudigweg 101v. Het is belangrijk om te begrijpen dat het volledige schema plus de 9 steken ertussen, plus alle steken aan de start en het einde van elke rij gehaakt moeten worden.
Rij 3 hecht garen A aan in eerste s, 1v, 10mozaïekst, 9mozaïekst, 3v al, 9mozaïekst, 9mozaïekst, 5mozaïekst, (1v al, 1mozaïekst) 5 keer, 4mozaïekst, 9mozaïekst, 9mozaïekst, 3v al, 9mozaïekst, 10mozaïekst, 1v, 1l, hecht af. [2 v, 11 v al, 88 mozaïekst]
Rij 4 hecht garen B aan in eerste s, 1v, 10v al, 9v al, 3mozaïekst, 9v al, 9v al, 5v al, (1mozaïekst, 1 v al) 5 keer, 4v al, 9v al, 9v al, 3mozaïekst, 9v al, 10v al, 1v, 1l, hecht af. [2 v, 88v al, 11 mozaïekst]
Haak het volledige deel tot het einde van het schema.
Knip het garen niet af na de laatste rij van het mozaïekdeel. Keer je werk.
Herh deel tussen mozaïekdeel en eerste mozaïekdeel een nog een keer.
Afsluitend deel
Ga door met garen A.
Rij 1 101v, 1l, keer. [101 v]
Rij 2 tot Rij 4 her Rij 1.
Rij 5 101v, 1l, hecht af. [101 sv
Rand:
Dubbele rand: Knoop de losse eindjes twee per twee aan elkaar met een dubbele knoop en knip ze af tot ongeveer 3 cm.
Met garen C en 5mm haaknaald.
Met de GK naar je toe. Hecht garen C aan in eender welke steek. Hv rondom rond met 101 s aan elke zijde. De hv wordt gehaakt met de draad aan de achterzijde. Sluit ronde met hv in eerst hv. Hecht af.
Met garen D en 4,50mm haaknaald.
AK Rand van Rand
Met de AK naar je toe, beg in eerst hv na een rechte hoek. Werk in de achterste lus van de halve vasten.
Toer 1 Sthst in de eerste hv, hst in zelfde hv, (99hst, 2hst in laatste hv, 2l, 2hst in eerste hv aan de volgende zijde) 3 keer, 99hst, 2hst in laatste hv, 2l, hv in staand hst om te sluiten [103 hst aan elke zijde, 4 2l-open]
Toer 2 2l (telt als eerste hst), 102 hst, ((2hst, 2l, 2hst) in 2l-open, 103hst) 3 keer, (2hst, 2l, 2hst), hv in de 2de l van de beg 2l ketting, hecht af. [107 hst aan elke zijde, 4 2l-open]
GK Rand van Rand
Met de GK naar je toe, werk in de achterste lus van elke hv, haak met garen D zoals AK rand.
Sluit Randen GK en AK Rand
Met GK naar je toe, breng GK en AK Rand naar elkaar toe, lijn de hst uit.
Hecht garen C met hv aan in eerder welke 2l open, 1l, (haak door beide binnenste lussen van de hst steken) 107hv, 2hv in 2l open 4 keer hecht onzichtbaar af. [436hv]
Naai het kussen vierkant op een kussensloop van 50cm x 50c m.
Patroon notities voor mozaïekdelen
•Als je aan het mozaïekdeel werkt dan wordt het garen op het einde van elke rij afgeknipt.
•Bij het mozaïekdeel werk je enkel aan de goede kant. Je keert je werk niet in het mozaïekdeel.
•Het patroon gebruikt 6 verschillende motieven: schedel, anker, ketting, X, ondersteboven schedel en ondersteboven anker.
•De motieven kunnen ook apart gebruikt worden, op die manier kan je aanpassingen doen of je eigen patroon creëren. Wees creatief.
•Elke eerste rij van elk mozaïekdeel begint met een basisrij.
•De basisrij is met rood gemarkeerd in het schema en bestaat uit enkel v
•Elke tweede rij van elk mozaïekdeel bestaat uit enkel v al
Legenda schema:
vierkant – v al
vierkant met kruis – mozaïekst
rood – v
De schedel
Op basis van 19 steken in garen A (rij 1).
Rij 2 garen B, 19v al.
Rij 3 garen A, 5mozaïekst, (1v al, 1mozaïekst) 5 keer, 4mozaïekst.
Rij 4 garen B, 5v al, (1mozaïekst, 1 v al) 5 keer, 4v al.
Rij 5 garen A, 5mozaïekst, 9v al, 5mozaïekst.
Rij 6 garen B, 5v al, 9mozaïekst, 5v al.
Rij 7 garen A, 5mozaïekst, 9v al, 5mozaïekst.
Rij 8 garen B, 5v al, 9mozaïekst, 5v al.
Rij 9 garen A, 3mozaïekst, 13v al, 3mozaïekst.
Rij 10 garen B, 3v al, 5mozaïekst, 3v al, 5mozaïekst, 3v al.
Rij 11 garen A, 1mozaïekst, 7v al, 3mozaïekst, 7v al, 1mozaïekst.
Rij 12 garen B, 1v al, 3mozaïekst, (3v al, 1mozaïekst) 3 keer, 2mozaïekst, 1v al.
Rij 13 garen A, 1mozaïekst, 3v al, 3mozaïekst, 2v al, 1mozaïekst, 2v al, 3mozaïekst, 3v al, 1mozaïekst.
Rij 14 garen B, 1v al, 2mozaïekst, 5v al, 1mozaïekst, 1v al, 1mozaïekst, 5v al, 2mozaïekst, 1v al.
Rij 15 garen A, 1mozaïekst, 2v al, 5mozaïekst, 3v al, 5mozaïekst, 2v al, 1mozaïekst.
Rij 16 garen B, 1v al, 2mozaïekst, 5v al, 3mozaïekst, 5v al, 2mozaïekst, 1v al.
Rij 17 garen A, 1mozaïekst, 17v al, 1mozaïekst.
Rij 18 garen B, 1v al, 17mozaïekst, 1v al.
Rij 19 garen A, 1mozaïekst, 17v al, 1mozaïekst.
Rij 20 garen B, 1v al, 17mozaïekst, 1v al.
Rij 21 garen A, 1mozaïekst, 17v al, 1mozaïekst.
Rij 22 garen B, 1v al, 17mozaïekst, 1v al.
Rij 23 garen A 1mozaïekst, 17v al, 1mozaïekst,
Rij 24 garen B 3v al, 13mozaïekst, 3v al.
Rij 25 garen A 3mozaïekst, 13v al, 3mozaïekst.
Rij 26 garen B 5v al, 9mozaïekst, 5v al.
Rij 27 garen A 5mozaïekst, 9v al, 5mozaïekst.
Het anker:
Op basis van 21 steken in garen A (rij 1).
Rij 2 garen B 21v al
Rij 3 garen A, 9mozaïekst, 3v al, 9mozaïekst.
Rij 4 garen B, 9v al, 3mozaïekst, 9v al.
Rij 5 garen A, 6mozaïekst, 9v al, 6mozaïekst.
Rij 6 garen B, 6v al, 9mozaïekst, 6v al.
Rij 7 garen A, 1mozaïekst, 1v al, 1mozaïekst, 15v al, 1mozaïekst, 1v al, 1mozaïekst.
Rij 8 garen B, 1v al, 1mozaïekst, 1v al, (3mozaïekst, 3v al) 2 keer, 3mozaïekst, 1v al, 1mozaïekst, 1v al.
Rij 9 garen A, 1mozaïekst, 5v al, 3mozaïekst, 3v al, 3mozaïekst. 5v al, 1mozaïekst.
Rij 10 garen B, 1v al, 3mozaïekst, 5v al, 3mozaïekst, 5v al, 3mozaïekst, 1v al.
Rij 11 garen A, 1mozaïekst, 5v al, 3mozaïekst, 3v al, 3mozaïekst, 5v al, 1mozaïekst.
Rij 12 garen B, 9v al, 3mozaïekst, 9v al.
Rij 13 garen A, 9mozaïekst, 3v al, 9mozaïekst.
Rij 14 garen B, 9v al, 3mozaïekst, 9v al.
Rij 15 garen A, 9mozaïekst, 3v al, 9mozaïekst.
Rij 16 garen B, 9v al, 3mozaïekst, 9v al.
Rij 17 garen A, 9mozaïekst, 3v al, 9mozaïekst.
Rij 18 garen B, 9v al, 3mozaïekst, 9v al.
Rij 19 garen A, 8mozaïekst, 5v al, 8mozaïekst.
Rij 20 garen B, 8v al, 5mozaïekst, 8v al.
Rij 21 garen A, 3mozaïekst, 15v al, 3mozaïekst.
Rij 22 garen B, 3v al, 1mozaïekst, 1v al, 11mozaïekst, 1v al, 1mozaïekst, 3v al.
Rij23 garen A, 3mozaïekst, 15v al, 3mozaïekst.
Rij 24 garen B, 8v al, 5mozaïekst, 8v al.
Rij 25 garen A, 8mozaïekst, 5v al, 8mozaïekst.
Rij 26 garen B, 8v al, 1mozaïekst, 3v al, 1mozaïekst, 8v al.
Rij 27 garen A, 8mozaïekst, 5v al, 8mozaïekst.

I love, love, LOVE anything with skulls and when you first showed us the sneaky-peek of this pattern (for the shawl) I was so excited! I’m on Ravelry today to buy this pattern because NEED!!! You have such talented hands and I just love the way you design.
LikeLiked by 1 person
Love this! Thank you Helen Roth
LikeLiked by 1 person
Thank you very much for this unexpected present.
LikeLike