(Using us/european crochet terms in this post)
What is mosaic crochet?
This technique gives you the opportunity to crochet two colour patterns without changing yarn in one row or round. You simple can connect rows or rounds by skipping a stitch and “filling” the skipped stitch with a double crochet 2 rows or rounds later with the alternate coloured yarn.
Picture: Two yellow (mosaic)dcs connecting two yellow rows over a blue row.

I really do not know who invented this method, it was not me, that’s for sure. I first saw it in the mosaic blanket by Lilla Björn Crochet. Since then i am totally hooked on this technique. I really use it a lot and i am always hunting for new patterns on Pinterest or Instagram which are able to crochet in the mosaic technique.
Most patterns are symmetric and “never ending”. They can be crocheted in rows or rounds. The character of the patterns worked in rounds appear like they do not have a beginning nor an end (like the up early hat).
I will try to give you a short introduction and hope that this will help you:
The most important things with mosaic crochet in my humble opinion (besides practice) are:
Reading a mosaic crochet chart
and
the special double crochet which is used (i call it the mosaic dc)
Reading a chart:
A mosaic crochet pattern follows a chart which can look like this:
example chart:
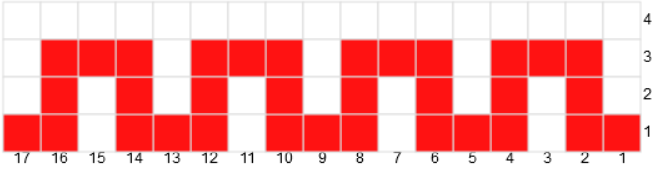
- The Pattern is crocheted from bottom to top and from right to left.
- Most patterns are worked in two colours (red = colour A, white = colour B). Usually you change colour after every chart row/round (= two crocheted rounds/rows). In this case: chart row 1 and 3 in yarn A, chart row 2 and 4 in yarn B.
- Every chart row represents two crochet rows or rounds in the same colour. The first row/round “creates” the pattern.
- Each square represents one stitch. If a Yarn B stitch appears in a Yarn A row you chain 2 and skip the stitch. Same when a yarn A square appears in a Yarn B row. Later you will “fill” the skipped space with a “mosaic double crochet”.
- Second round is always: one sc in every sc and dc, a chain2 over every chain 2.
- Colour changes are done in the last stitch of the row or round with two loops on hook.
- First chain in a row or round does not count as stitch.
- If you work in rows I recommend to add two stitches in the beginning and in the end of every row. Otherwise it will not be possible to start a clean row with an alternate colour stitch.
- You need at least one row or round of stitches to start be able with the mosaic pattern. These row or round is not always written in the chart.
A written pattern for the example chart would look like this (plus a few of my comments)
In colour B:
Row 1 Chain 22, turn. (17 stitches in chart plus 2 in the beginning, plus 2 in the end, plus 1 to turn) this row is not written in the chart)
Row 2 sc in second stitch, 1sc in every stitch, change to colour A chain1, turn (21 sc, this row is not written in the chart)
In colour A (red in chart):
Row 3 ch1, 2sc in first 2 stitches (not in chart), 2sc, ch2, skip1 stitch, *3sc, ch2, skip1*, rep 2 times, 2sc, (chart completed), 2 sc, turn.
Row 4 ch1, 2sc in first 2 stitches (not in chart), 2sc, ch2, skip1 stitch, *3sc, ch2, skip1*, rep 2 times, 2sc, (chart completed), 2 sc, change to colour B (in last stitch with 2 loops on hook) turn.
In colour B (white in chart):
Row 5 ch1, 2sc, (not in chart), 1sc, *ch2, skip1, 1mosaicdc, ch2, skip1, 1sc*, rep 3 times (chart completed), 2 sc (not in chart), turn.
Row 6 ch1, 2 sc, (not in chart), *1sc, ch2,skip1* rep 7 times, 1sc (chart completed), 2 sc, change to colour A. (in last stitch with 2 loops on hook) turn.
In colour A (red in chart):
Row 7 ch1, 2sc, (not in chart), *ch2, skip1, 1mosaicdc, 1sc, 1mosaicdc*, rep 3 times, ch2, skip1 (chart completed), 2sc, turn.
Row 8 ch1, 2sc (not in chart), *ch2, skip 1, 3sc* rep 3 times, ch2, skip1, (chart completed), 2sc, change to colour B (in last stitch with 2 loops on hook) turn.
In colour B (white in chart):
Row 9 ch1, 2sc (not in chart), *1mosaicdc, 3sc* rep 3 times, 1 mosaicdc (chart completed), 2sc, turn.
Row 10 ch1, 2sc (not in chart), 17sc, (chart completed), 2sc.
(pattern and chart completed)
A tabloid case using the chart /pattern above (with no extra stitches in the beginning and end, that is why a small stitch is visible in the beginning and end of chart row 3):

The Special Double Crochet
As I said before i call this special stitch the mosaicdc. It is crocheted two rows or rounds below in a skipped stitch in front of work.
The mosaicdc: double crochet in skipped stitch two rows below, in front of 2 ch2 spaces (front of work).
The mosaicdc goes always in same colour round or row, except of course for the first round or row with a new colour.


Yarn over, insert hook in skipped stitch.
,

Yarn over, pull through

Yarn over, pull through 2 loops, 2 loops on hook.

Yarn over and pull through two loops on hook (like a normal double crochet).
That is basically all you need to know to crochet the most beautiful patterns with this method.
I hope that this short introduction was helpful and understandable. If you have questions or something in my explanations is not clear, please leave a comment or write me a message. Hope you have fun with this technique!
I will show you a few things i have crocheted with this technique.
The backside of the tabloid case:
A variation of Lilla Björns Mosaic Blanket :
A possibility to place your coffee cup:
Part of the peano scale:

And of course The Up Early – Up North Hat
 More adventures ahead. More to come soon from up north…

What a fabulously informative post!
LikeLiked by 1 person
Thank you! 😊
LikeLike
Look up Lily Chin this is where I first heard of Mosaic Crochet and I love all her patterns.
LikeLike
Vraiment magnifique. Cela me fait penser aux toiles de mon peintre favori Vasarely. Je suis fane 😍✌
LikeLiked by 1 person
Consulta, cualquier gráfico de crochet común, sirve para mosaico?? Muy buena tu explicación!!
LikeLike
This is so exciting – looking forward to giving this a try!
LikeLiked by 1 person
Karen,
These look thick. Could they be used as a throw rug? Thanks, PH
LikeLiked by 1 person
Hi, I think it depends on yarn and hook size and tention. Put I guess it us absolutely possible. I made a few blankets with this technique and they are a little thicker.
LikeLike
when we got our baby, our first priority is to give them the best baby care that we could give::
LikeLike
Thanks ! You made my day, that’s exactly what i was looking for. Matildeledimanche, from France
LikeLiked by 1 person
Greetings from Sweden to France. Happy that I could help! 🤗
LikeLike
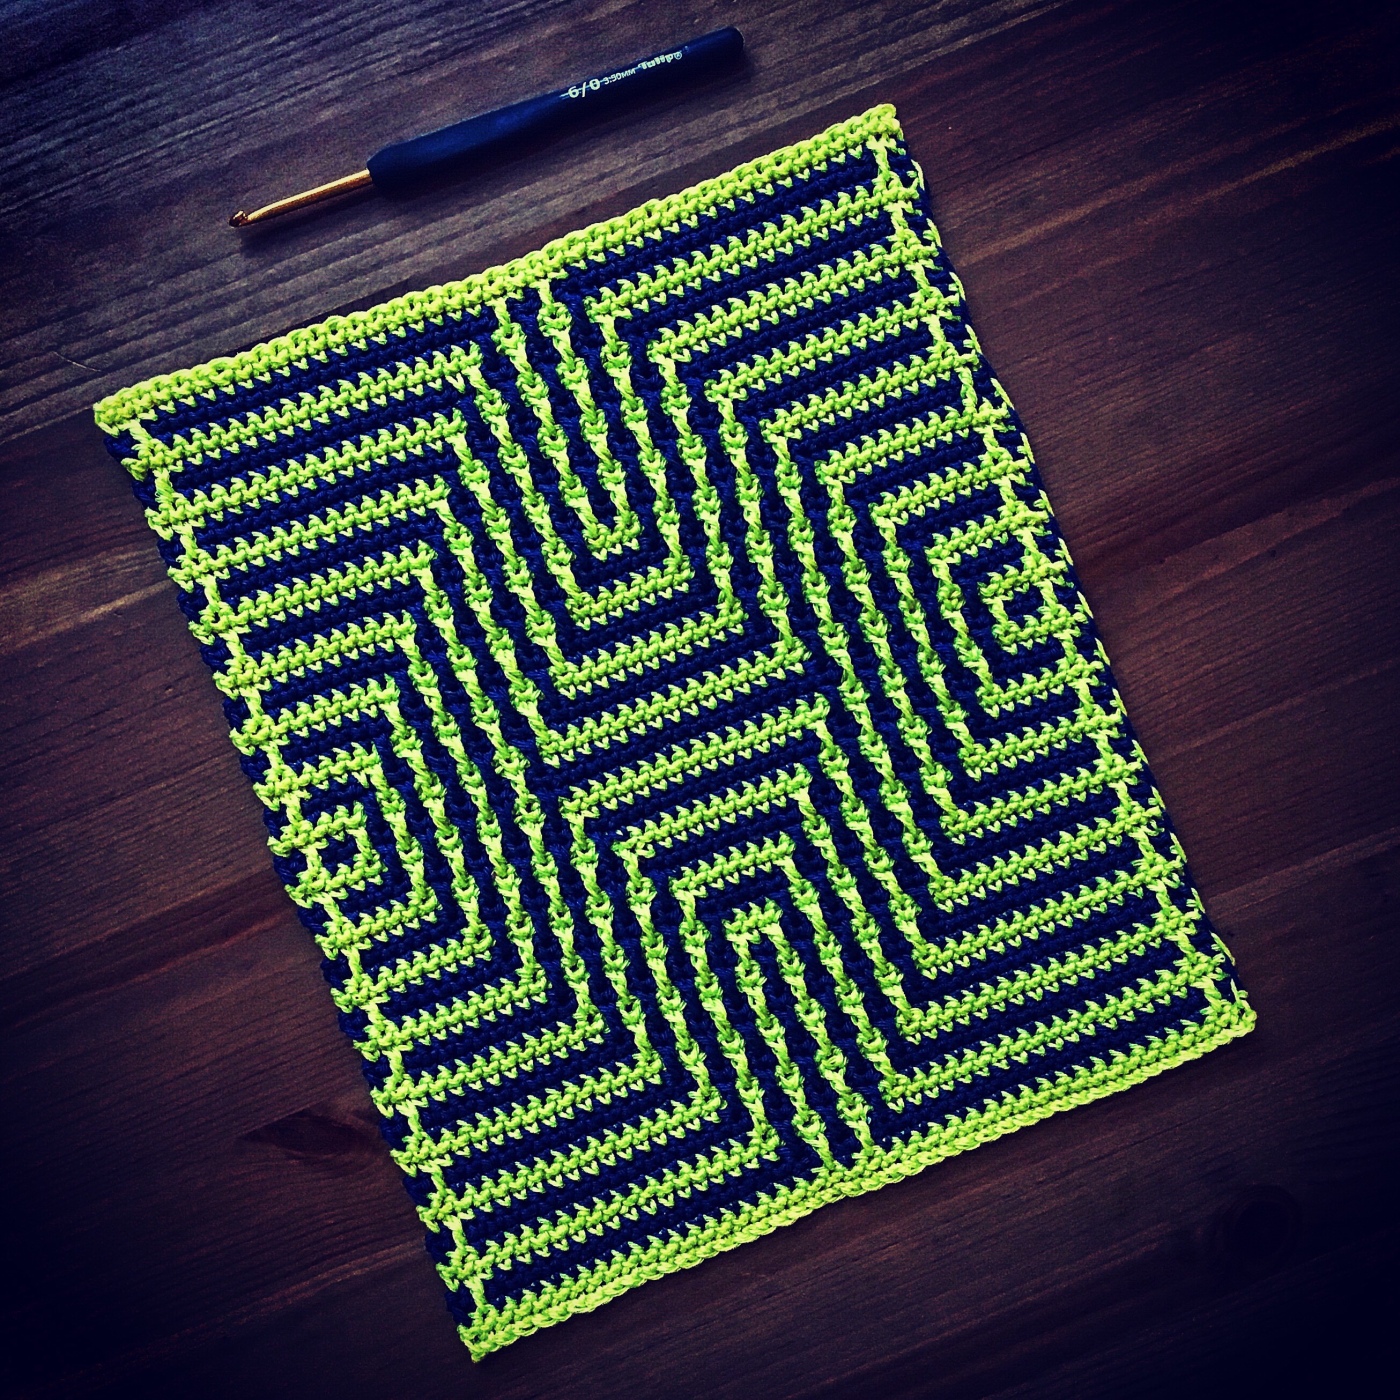
Is there a pattern for the green and blue optical illusion style piece at the top of the article?
LikeLiked by 1 person
So versatile! You might also be interested in this technique and her patterns work up beautifully.
https://interlockingcrochet.com/
LikeLiked by 1 person
I love your variation of Lilla Björns Mosaic Blanket. Could you share the stitches you used for the all white portion of the blanket?
LikeLiked by 1 person
Thank you. The white part is attic24 cozy stripe blanket. https://attic24.typepad.com/weblog/cosy-stripe-blanket.html
LikeLike
Hi Martin – thank you SO much for this introductory lesson. I was really scratching my head over the pattern until I re-read your general instructions that says every row of the pattern represents TWO rows of crochet… Maybe it’s just me, but I would highlight that bullet in bright yellow to make it more clear. (Then again, I am old…and, well…need I say more?)
One quick question – do you carry your colours up the side or do you cut and re-join them every couple of rows? Seems like they would be best carried up the side to avoid all the ends to bury. Any tips or tricks regarding that would be most welcome.
Again, deep thanks!!
LikeLiked by 1 person
Thank you for your feedback! I carry the yarn. So two balls are attached to the work all of the time.
LikeLike
Good morning from Texas
Fist of all, I want to tell you that I love all your patterns and I was wondering if you can direct me to the (red and yellow picture) pattern. I really like it and I am not too creative to chart it myself.
thanks for your help.
Have a good one.
Linda
LikeLike
thank you, after struggling to learn this, your instructions made everything clear, I think I might be ‘hooked’
LikeLiked by 1 person
I’m curious what the numbers across the top and on the left side of the chart refer to… I cannot make sense of those numbers.
LikeLike
I do have many questions .. but I need to list them against your instructions.
well may you sigh, my dear: old ladies are remorseless with questions. 😀
LikeLiked by 1 person
I want to thank you for explaining this so well. I was so confused following patterns or CALS with this method but you cleared it all up. You are amazing!! Now I can start practicing with those endless patterns lol
LikeLiked by 1 person
Question: When you so the mosaic double crochet do you go through both loops or only the front loop? Thank you!
LikeLiked by 1 person
Both loops when you do the 2row technique. Flo in the one row technique.
LikeLike
Thank you for great explanation on mosaic crochet…it’s the best . 👌💯
LikeLiked by 1 person
Going to try my first mosaic crochet blanket and am so happy to have found your post. To hear that there is a version that I don’t have to cut my yarn on every row and avoid the need to weave in ends is AWESOME! Thanks for your explanation.
LikeLiked by 1 person
Thank you so much. I could not crochet mosaic patterns at all. You made it all very clear. great instructor!!!
LikeLiked by 1 person